How to make a beautiful card for dad. Homemade surprises from the little princess: what to give dad for his birthday with his own hands? Volumetric and stylish crafts
Like all people, whether adults or children, dads love gifts, not only for birthdays, but also on other holidays. Parents are especially pleased with gifts from their beloved children made with their own hands. Such things, which parents usually keep for a long time, are truly pleasant and surprise much more than purchased gifts.
Children’s handicrafts are always the most desirable, because they are prepared with soul and love for a loved one, and the wise father can sincerely rejoice and appreciate the children’s work with dignity, not forgetting the well-deserved praise.
Tip: before you start making crafts, choose an option for what you will be making. Then prepare the necessary materials and get involved in the process. But for a small child this is a rather difficult task, so he cannot do it without the participation of adults. So, let's make a gift for dad.
Funny cards

- We form a postcard from a thick sheet, folding it in half, and on the front side we glue a smaller rectangle of colored paper;
- Having drawn a large outline of a palm on another sheet, place a small palm in it, cut out the picture and glue it to the front side of the postcard;
- the inner part is for congratulations; we decorate it with touching wishes for dad, with lovingly selected photographs.

Advice: let the small palm be the outline of the child’s hand, and the large one the outline of the father’s hand; if you manage to make it, then the gift will be especially memorable, and the value of the postcard will increase much.


Other DIY Crafts for Dad
- Older children are quite capable of making an original tree called topiary for their dad’s birthday. To work, you will need very little - a few old newspapers, a couple of handfuls of coffee beans, a branch or stick, a large ceramic cup, decorative elements.
How to form a topiary with your own hands:
- Make a small ball from crumpled newspapers, wrapping it with twine;
- Use the remaining twine to carefully wrap the branch-trunk, inserting its sharp end into a ball of newspaper;
- the ball greased with glue is completely covered with coffee beans, dad will be pleased to inhale their aroma;
- A tree is inserted into a ceramic container filled with pebbles, decorating the top layer of “earth” with colored shavings.
Tip: to make the gift look festive, you can wrap the container in lace, knit a cover in the tones of the color scheme of coffee beans, and add a little creativity using decorations.

- stable tall glass made of plastic;
- reliable glue, it should be transparent;
- fabric strips, light decorative elements.
Ribbons of contrasting colors are glued to the bottom and top of the glass as cuffs. The free part of the glass is evenly decorated, and strips of fabric are decorated with wishes for dad.
Tip: for inscriptions, it is better to choose colored pencils, having previously moistened the lead. Text written with a felt-tip pen on fabric will blur. Before giving the craft, fill the glass with candy.

DIY goodies for dad with a sweet tooth
What man would refuse delicious food, especially if the dish was prepared by people dear to his heart. A daughter, or maybe even a son, will be able to prepare his favorite salad for dad’s birthday. And under the guidance of her mother or grandmother, she will try to bake a delicious cake, decorating it festively.

How to make your dad's own chocolate fruit salad:
- choose fruits according to the season, you can add berries, wash and divide them into parts;
- melt the chocolate to a liquid consistency;
- stick wooden toothpicks into pieces of fruit and dip them in hot chocolate;
- Having placed chocolate fruits on a dish, send the gift to harden in the refrigerator.
Tip: it is advisable to decorate a dish with a fruit composition beautifully; you can wrap each piece in foil or bright paper, because this is not an ordinary dish, but a birthday present.

Men are reserved people, sometimes even stern; they do not always demonstrate their emotions violently. But rest assured, the father is always infinitely happy to receive congratulations with sweet signs of attention from his children, and not only on his birthday, especially if the gift was made by them.
An important and special person in a child’s life is dad. Thanks to him, the baby feels protection and reliability, at the same time love and care, which is why children very often love their dad with strong and unconditional love. Little family members carefully prepare for the upcoming holidays, they love to make gifts on their own, including willingly preparing a birthday present for dad with their own hands. There are many ideas for such needlework, and you can easily help your child if you take his idea seriously.
An important and special person in a child’s life is dad.
How to congratulate dad on his birthday if it’s his anniversary? A gift for dad can be made by a child of any age: from a small preschooler to a teenager. Depending on the age category of the donor, you can choose the best ideas for making your own and drawing a postcard.
- The youngest family members can make a card or applique for their daddy. Other family members should be patient and help the baby prepare a surprise for dad.
- Preschoolers of middle and senior preschool age can also cope with making gifts using the origami technique, making the simplest and most unpretentious souvenirs.
- Older girls and their mother can bake a cake for their father, and experienced little craftswomen can cope with such a simple process themselves, without the help of their elders.
- A small souvenir in the form of a key ring, an original tie pin or a cufflink, made with your own hands, will delight the parent and leave warm memories for a long time.
Gifts from children are always especially dear to parents; as a rule, they keep such memorabilia throughout their lives, sorting through them from time to time and indulging in warm memories.
Postcard-suit for dad (video)
Paper craft from son for dad's birthday
Every son, young and older, can give dad a birthday card. Paper postcards look especially original, especially if they are themed and related to dad’s dream or his hobby.
For such a special surprise, you will need the simplest and most accessible material:
- colored cardboard;
- colored paper;
- scissors, glue;
- photographs of family members.

Every son, young and older, can give dad a birthday card.
Initially, you should decide what attracts or interests your father most in order to reflect this idea in a gift. For example, for a car enthusiast, especially one who dreams of a new car, the ideal gift would be a postcard depicting daddy driving.
- The car is cut out of colored paper, carefully cutting out the windows. Separately, cut out wheels from paper of a different color - this will make the card bright and colorful.
- They paste a template of the car onto cardboard, cut out the faces of family members from family photos and glue them into the windows of the car - these are the passengers of the new car.
- The postcard is complemented with three-dimensional details: headlights, landscape elements.
You can make the car on the postcard exactly the color that the parent prefers - the father will be pleased that the children are attentive to him down to the smallest detail. It will be especially pleasant to receive such a surprise from your son: in this way the boy will show that he understands and feels his dad.
Birthday gift for dad and grandpa: a sock tank step by step
Gifts for the holidays for men are often distinguished by the fact that they give exactly the necessary and sought-after things: socks, key chains, underwear. What if they are, indeed, always relevant and therefore necessary? You can get creative and present simple socks, originally designed as a tank souvenir.
For an original and practical souvenir, you should stock up on the following materials:
- 5 pairs of socks;
- a small bottle of any drink, depending on the birthday person’s preferences;
- rubber bands, twine, colored paper;
- wine cork, double-sided tape;
- glue and toothpick.
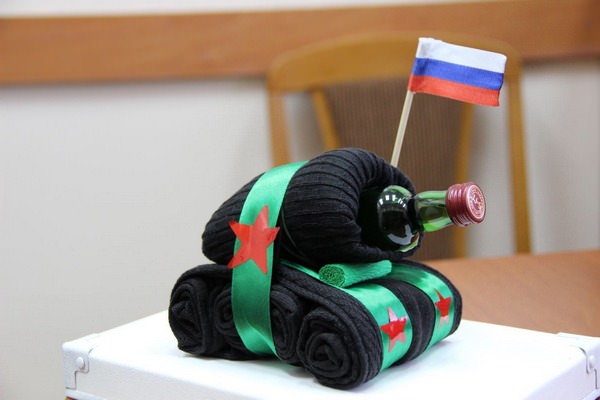
Gifts for the holidays for men are often distinguished by the fact that they give exactly the necessary and sought-after things
An unusual tank is easy to make if you follow the step-by-step sequence of actions:
- The socks are laid out in one row in such a way that the heel lies in the middle. Roll each sock into a tight roll, rewinding it with an elastic band, and attach three pairs to each other in this way.
- The resulting “tank harp” is wrapped in a pair of socks, inserting one sock into the other.
- The neck of the bottle is wrapped with twine, secured with glue, in this way a tank tower is obtained. From the remaining pair of socks they make the tank itself, carefully insert the bottle into the sock and tuck it in, smoothing out the wrinkles.
- Place the tank on the gusli and tie it with a festive ribbon to secure it.
This craft will delight you with its practicality and creativity; simple socks in beautiful and non-standard packaging may not remain a memorable gift for life, but they will bring a lot of positive emotions.
How to make a gift for dad using sweets with your own hands
Often men turn out to have no less a sweet tooth than women. They love sweets very much, especially prefer good chocolates with tea or stronger drinks.
Girls can please their strong parent with a special gift of sweets, originally designed with their own hands. Football fans can be pleased with a “sweet” ball, for which you will need the following materials:
- foam ball;
- polystyrene foam, toothpicks;
- corrugated green paper and green organza;
- tape, glue;
- chocolate candies in white and black wrappers.

Men often have no less of a sweet tooth than women.
Before starting work, insert a toothpick into each candy from the side where the candy wrapper is twisted and wrap the joint with tape.
- Alternating white and black candies in a circle, they are inserted into a foam ball, imitating the pattern of a real soccer ball.
- The foam is covered with corrugated paper - this is a football field.
- A stand for the ball is made from organza and attached with tape in the center of the foam field and the “candy” ball is secured.
Such a treat can be served at the table so that all guests can appreciate the skill and ingenuity of the children.
Origami gift for dad
Gifts made using the origami technique are not only practical, but especially original. An interesting gift for a man would be a box for storing cufflinks and pins, made using the origami technique.
It is advisable to use bright, glossy, fairly thick paper for crafts, since the box should be festive and quite thick.

An interesting gift for a man would be a box for storing cufflinks and pins, made using the origami technique.
- Real origami is made without a drop of glue, otherwise it will be a fake. Perhaps quite high quality, but the original is much more attractive.
- A thick and bright sheet of double-sided colored paper is folded according to the instructions, carefully ironing the fold lines to fix them.
- The finished box can be decorated with decorative elements from the category of self-adhesive materials (remembering the ban on the use of glue when working with origami techniques).
Origami gift options
In addition to a useful box, you can prepare many surprises for your beloved daddy using the origami technique.
- Preschoolers will do well with a simple boat made of paper. Such a souvenir can be decorated or made into an element of an entire gift panel.
- Postcards folded in the shape of a shirt and tie look beautiful: you can encrypt and write a warm message on it, which a loving parent will probably keep for the rest of their lives.
A simple crane from a child in its beak can “bring: a banknote from mom or grandma: such joint messages unite the family.
If you want to make a person happy, give gifts, and give the best to your loved ones. In this article we will look at how to make a gift for dad from his daughter with his own hands.
You will need: black cardboard, scissors, felt-tip pens, segment knife, white cardboard, white sheet of paper, spray glue or glue stick, printer, cutting mat, silver gel pen.
Master class

Book safe
You will need: book with hard cover, PVA glue, water, stationery knife, brush, pencil, ruler.
Master class

You will need: deep cardboard box, disposable paper plates and cups, acrylic paint, pencil, ruler, tape, stationery knife, long wooden spatulas, 2 orange corks, red flat button, colored paper, felt-tip pens.
Master class
- Close and seal the box with tape.
- Draw the silhouette of the doors with a pencil.
- Cut out the doors.

- Cut the windshield across the box.
- Fold the windshield forward and make a wide slit.
- Secure with tape.

- Make the seats by folding the back down.
- Paint the car with acrylic paint.
- Cut the base of the paper cups and glue the lights on. Make an exhaust pipe from the rest of the glasses.

- Make a radiator grill using 6 spatulas.
- Make a sight glass divider using the seventh spatula.
- Make hazard lights out of traffic jams.

- Glue the wheels using plates.
- Draw logos with a felt-tip pen.

- Cover the interior with colored paper. It is better to use a brown color that resembles natural leather.
- Glue a red button and draw a smiley face on it.
You will need: 2 rapan shells of different sizes, a small stone, large round shells, small spiral-shaped shells, a glue gun, toothpicks, wooden skewers, varnish, thick cotton thread.
Master class
- Apply glue to the stone and glue a larger rapana shell. The shell should not wobble, it should be firmly attached to the stone.

- Glue a wooden skewer inside a smaller rapana shell. This will be the bow of the ship.
- Glue the skewer with the nose onto the base of the sailboat.

- Glue 3 wooden skewers perpendicular to the base of the ship.
- Trim the first and third skewers so that they are just below the middle skewer.
- Glue large shells as sails on the front side of the mast, and on the back side glue toothpicks that will serve as yards. There should be 3 shells on each mast.

- Make ropes from cotton thread in this way: tie the thread to the back of the ship, then pull it along the top of the masts all the way to the bow, then stretch the thread from bottom to top, winding it onto the yards on each mast, and if the thread slips in some places, fix it with glue.

- Glue spiral shells to the tops of the masts.
- Cover the craft with varnish.
The shell ship is ready!
You will need: open cones (from 50 to 300 pieces), wire, glue gun or superglue, varnish.
Master class

Tank in modular origami style
You will need: sheets of colored paper, scissors, 6 matchboxes, glue, a round blank for the base (for example: a perfume bottle).
Master class
- Fold the modules according to this diagram. For the entire tank you will need 1408 modules.

- Assemble a circle of 24 pieces, then add 24 pieces to the second row of the circle and 24 pieces to the third row.
- Place 12 modules in the center.

- Make a total of 7 wheels in this way - 6 for the tracks and one for the tower.
- Make a caterpillar for the tank by preparing 204 modules - the width of the caterpillar is 6 modules, the length of the almost completed circle of the caterpillar is 34 modules.
- Place 3 wheels in the nearly completed circle of the track, then continue working to complete it by adding 56 modules.

- Make the second caterpillar in the same way.
- Make a tank tower this way: make a hole in 4 matchboxes as shown in the picture and glue them together.
- Cover the base of the tower with colored paper.

- Insert a round piece into the hole and glue 2 matchboxes as tower stands.
- Assemble the front part of the tank from 42 modules - width 7 modules, length 6 modules.
- Assemble the rear part of the tank from 30 modules - width 6 modules, length 5 modules.
- Glue the front and back pieces to the base of the tower.
- Glue the tracks.
- Take the seventh wheel and add 192 modules - 24 in length and 8 in width. Don't forget to leave a hole for the cannon.

- Assemble a cannon from 36 modules - width 3 modules, length 12 modules.
- Glue the cannon to the tower.
- Attach the tower to the base, it can rotate.
Postcard “Shirt and tie”
You will need: A4 colored cardboard, scissors, ruler, glue, felt-tip pens, pencil, decorative elements (buttons, glitter, threads).
Master class

creative indoor flower
You will need: pot, foam, skewers, artificial grass, glue gun, candy bars, chewing gum, gift cards, etc...
Master class

The creative indoor flower is ready!
Coffee mug
You will need: mug, coffee beans, cotton pads, thick white thread, brown acrylic paint, superglue.
Master class

Coffee heart
You will need: coffee beans, paper, wire, thread, glue, cardboard, jute thread, sponge, iron can, brown paint, ice cream sticks, decorative elements - flowers, ribbons...
Master class
- Fold a piece of paper in half and draw half a heart, then cut it out.
- Trace the heart on cardboard and cut it out in 2 copies.
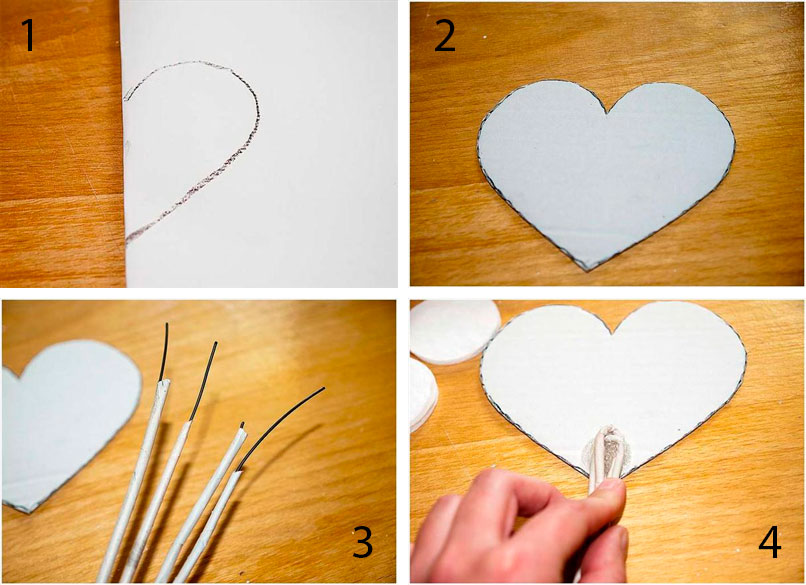
- Wrap 2 pieces of wire in paper and glue to one heart. Repeat this process for the second heart.
- Glue cotton pads in several layers between the hearts to make the design three-dimensional.

- Cover the entire heart with cotton pads and wrap with thick thread.
- Color the heart.
- Glue the coffee beans in 2 layers.

- Cover the jar with popsicle sticks.
- Wrap the wires with jute thread.

- Stick the coffee tree into the sponge, then place it in the pot.
- Decorate to your taste.
The coffee heart is ready!
You will need: shells of the desired size, cardboard, scissors, glue gun, simple pencil, awl or hole punch, twine or rope, sesal, burlap, optional decorative elements - beads, seed beads, starfish...
Master class
- Draw a heart on the cardboard.

- Cut it out.

- Make 2 holes for hanging using a hole punch or awl.

- Glue sesal to the front of the heart.
It's my beloved dad's birthday. And, of course, you and your baby want to please him with an interesting gift. Then you are in the right place and reading the right article :). Today we will do with you DIY birthday card for dad. Handmade gifts are always especially appreciated! This is also a good educational activity for your child. And if your Dad is also a musician, then he will especially like this card. Well, let's start putting words into action!
Theory
For the postcard you will need:
1. Paints (finger paints and any others: gouache, watercolor, etc.).
2. 3 jars of water (for washing brushes).
3. Brushes (3 pcs.).
4. A cloth to wipe the brushes (so that the paint from a wet brush does not become too liquid).
 5. Base-1 “dad man”. Download and print the drawings (3 copies) at the end of the article.
6. Base-2 for a three-dimensional heart and letters. Download and print the drawings (3 copies) at the end of the article.
7. Oilcloth for covering the floor and protecting it from finger paint, which the baby will draw with. Also, bring wet wipes and wear clothes that you don't mind getting dirty.
8. Scissors.
9. PVA glue or double-sided tape.
10. Double-sided colored cardboard (1 sheet) and white cardboard (2 sheets).
11. Paper clips (4 pcs.).
12. Black felt-tip pen.
13. Black pencil.
Note: If your child is very small, stock up on more brushes and foundations than you need, and take a couple of your child’s favorite toys. And if the child starts to get distracted and wants to tear something or put it in his mouth, you can give him spare copies. And if you see that the child is completely tired or bored, interrupt the process. You most likely won’t make a postcard in one go. Moreover, the paint must be allowed to dry. We made the postcard in two days in two passes. I specifically chose a card that was more or less simple, so that it wouldn’t be difficult and tiring for the child, and for me too.
Practice
1. Prepare a workplace where you will create together with your child, and all the necessary materials for the postcard.
2. Print out base-1 and base-2 and staple them onto white cardstock. This is done so that they do not move around the table too much. Once they're ready, we'll cut them out to make the card without removing the staples!
3. First, decorate the daddy man that you will glue on the outside of the card.
If your child is still small, like mine (my son was about 11 months old), then dip the brush in the paint, place it in the child’s hand and, holding it with your hand (hand-in-hand technique), together paint the little man-dad. And if the child is already old enough, let him do as much as possible himself.

4. Write on a piece of paper with brushes together with your child “Dad, we love you!” Or let the child do it himself!

5. Since the child has already sat for a long time, it’s time to move. So get busy finger painting. We sit comfortably together with the child on the floor, take finger paints, and go ahead, decorate the base-2 under the heart :). Draw with your fingers and palms, the way your baby likes it best.
You and your child can also decorate base 2 with a heart and tassels, and then choose the one you like best.

We are moving closer and closer to completing our gift: "
6. When the bases are dry, first take base 1. Cut out the parts of the paper daddy man and glue them onto the cardboard. This is what we should get as a result:

The headband of the headphones is not drawn on base-1. Finish it by hand with a black wax pencil.


8. Take double-sided colored cardboard and bend it in half, making a blank for card for dad.
I only had one-sided colored cardstock, so I glued colored paper inside the card. Please note that if you take double-sided colored cardboard, the inside and outside of the card will be the same color. If you want it to be two-color, like mine, then you also need to stick colored paper inside.
9. Glue a little daddy man onto the outside of the card blank. Here's what happens:

Glue a heart, as well as pre-cut letters, into the inside of the blank. When you open a postcard, your heart will unfold along with it. Looks beautiful!

10. We put the finishing touches on the card: we outline the contours of the human dad with a black felt-tip pen, add the phrase: “my dad is a musician” or something of our own, and write inside the card: “Happy Birthday.”
That's all DIY birthday card for dad, ready! Hooray! Well done! :)
Children make their own cards for all holidays to their parents at any age. Kids make crafts from paper, pencils and glue, and adults already use high-quality materials and their artistic vision. Both mom and dad will be pleased to receive a handmade card from their child. Dad will be touched no less than mom by such a manifestation of love and care.
Men's cards are often even easier to make than women's ones, unlike the abundance of flowers and lace, here you can focus on the plot. Remember what your dad loves most, what his hobbies are. Use them as a basis when creating a birthday card. Don't forget to add a congratulatory inscription and the card is ready.
Postcards for children under 10 years old
Children enjoy drawing, sculpting and making paper crafts. With mom's help, both daughter and son will be able to create a simple postcard for dad with a touching congratulation. The inscription inside in uneven handwriting “To my beloved daddy” will be treasured by my father all his life.
- Postcard with a picture pencils , paints or crayons.
- Postcard with applique. You can cut out pictures from magazines, print them on a printer, or choose a suitable color of paper and create an interesting collage.
- Postcard with origami figurine on the cover, this postcard is interesting for its volume.
- Postcard with photo dad in a beautiful frame.
- Postcard with plasticine elements.
In some cases, the child will need his mother’s help to carefully glue small parts, cut out appliqué elements, and for other still complex work.
A card for dad reflecting his interests
In adolescence and adulthood, you can already create more professional and interesting postcards. At first, you can use special diagrams that show the correct arrangement of elements, and then move on to independent creativity.
Men's cards are most often made based on the interests of the birthday boy, if he likes technology, then its pictures are used in the decor, ships and anchors are also suitable for a lover of the sea, and a lover of cycling should make a postcard with a bicycle.
In this video master class you can see how a man's postcard is made, and what materials and tools you will need to create it:
Postcard in masculine style
Men's style in cardmaking is most often built not only on men's hobbies, but also on accessories. These are items of clothing, watches, chains, pince-nez and much more. Some time ago, mustache prints came into fashion. You will be able to find designer papers that play up this masculine element of the look, paper decorations and much more.
In addition, you can choose purely masculine scrapbooking styles for making postcards - steampunk, grunge, and also mixed media. Paint, texture, metal elements and much more play a role here.

Paper for men's cards is usually selected in blue, gray, brown tones, but it does not necessarily have to be dark. Many cards are made on a light blue, sand, or beige background, which is also appropriate for men’s work.
When making a card for dad, a daughter or son is faced with the task of selecting appropriate decorations; if everything is clear for a mother’s gift, you need a lot of flowers, then a man’s work raises questions for many.
First, you should decide on the style of the postcard; it will help you choose decorative elements. For example, you chose a nautical style and printed a picture of a sailboat, how can you complement it:
- Waxed cord imitating tackle;
- Paper with wood planks under deck;
- Seagulls;
- Sea waves;
- Screws or nails.
For sea postcards with lighthouses you can take:
- Shells;
- a net representing a seine;
- starfish;
- paper can be combined in sand and sea colors.
If you choose steampunk, then the main decorations will be gears. You need to create an interesting composition from them so that they cling to each other and turn the mechanism. Along with gears, you can use images of pocket watches on a chain or large dials.
When making a postcard for dad’s hobby, it’s worth choosing several elements of different sizes that emphasize the main idea. For example, the main element would be a picture of a fisherman in a boat or a fish. Together with it, you can use reeds, mesh fabric, a float in decoration, and take the base blue, like river water.
Unlike women's decor, men's decor carries meaning. Try to choose not just jewelry that is suitable for a man, but ones that support your story or your idea. You can use not only printed pictures. Professional decor will help you make your postcard complete and interesting. Take a look at the chipboard, brads, and die-cuts that suit the purpose. Designer paper with the desired design and all other decorations can be found in craft stores.
A card for dad should be made from the heart, even if it is not perfect, the main thing is that you put your love and tenderness into it, write important words and leave a memory of this birthday.
Latest site materials
Cosmetology

Research work “Stones and minerals of the Perm region”
Project participants: Implementation: teacher Popovtseva O.V., music director Palekhova O.V. Target group: pupils of the preparatory school group, parents of pupils. Project scale: In terms of implementation time - short-term (6 months)
Cooking

Original do-it-yourself gift wrapping Beautiful do-it-yourself New Year's gift wrapping
The holiday is just around the corner, so we offer you gift wrapping ideas for the New Year 2019. Every year, the design of a New Year's surprise is not the least important. Individuality can emphasize the value of a present. And it’s more pleasant to receive a surprise in a different place.
Cosmetology

How to knit a beautiful children's sundress for a girl with crochet and knitting: instructions for beginners
We offer you a very delicate and airy lace outfit for your little princess. Attention! Only partial quotation is possible with obligatory reference to. Crocheted sundress for girls Prepare: 150 g of Vita cotton Lira yarn, color - milky, 40 g of yarn
Horoscope

How to make a cardboard box with your own hands
The box is a wonderful thing in which you can store various little things. Not only is it functional, but it also brings a certain charm to the design of your room. However, you don’t have to go to the store and buy a suitable box. You can do it yourself
Experience

Making traditional Ukrainian embroidery with your own hands
Vyshyvanka is a national Ukrainian clothing that adorns anyone who wears it. Many people are interested in how to make such a piece of clothing themselves, how to embroider an embroidered shirt with their own hands. History of embroidered shirt According to archaeologists, the history of embroidered shirt has
Experience

Homemade surprises from the little princess: what to give dad for his birthday with his own hands?
Like all people, whether adults or children, dads love gifts, not only for birthdays, but also on other holidays. Parents are especially pleased with gifts from their beloved children made with their own hands. Things that parents usually keep