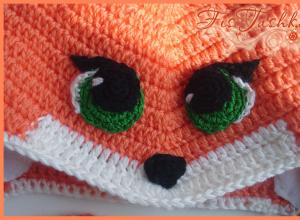
Crochet eyes for a fox hat. Funny hat in the shape of a fox
Hello!!! Yesterday I finished a fox hat for my youngest daughter - she’s such a cunning one))) As always, I came up with it while knitting))) I haven’t found one like this on the Internet anymore)))
Here is the result of my labors (I bandaged the base 3 times)
The muzzle is closer)))

I knitted it using Diamond yarn from Vita in two threads, hook number 5, and decorated it with details knitted from different yarns.
Now the master class)))
We knit with double crochets. For lovers of diagrams, I sketched out a diagram in Photoshop (all photos are enlarged)

Now for some clarification. So, let’s start knitting 12 dc into a ring. Then add 12 dc in each row.
2nd row. 24 dc, that is, we knit two dc in each loop
3rd row. 36 dc, make two double crochets in one loop, dc, and so on until the end of the row
4th row. the increases look like this - dc, dc, 2 dc in one loop, etc., knit to the middle of the circle and knit 5 dc in one loop - this way we will form an angle - it forms the face of a chanterelle, then we continue to knit with the usual increases.
5th row. the increase is as follows - dc, dc, dc, 2 dc, etc., we knit to a group of 5 dc in one loop, we simply knit the first two stitches with dc, in the middle we make 3 dc, then again double crochets, one in 4 -th and 5th loops of this group, then knit with the usual increases.
6th row. increase - dc, dc, dc, dc, 2 dc, etc., knit to a group of 3 dc in one loop, in the first of the group we knit 1 dc, in the second - 3 dc, in the third - 1 dc , we knit further with the usual increases.
And then we knit with an increase of 12 dc in each row, and we knit the middle part as in the 6th row.
We knit this way until the diameter of the round part reaches 11-12 cm (for a head volume of 48 cm, for a larger size you can make the flat part 12-13 cm), then we make increments of 12 DCs every other row, but continue to knit the middle part in the same way as in 6- m row.
Upon reaching the required size of the hat, we finish adding 12 dc, and now you will need to subtract 2 dc in each row (because that’s how much we add in the middle corner part) - I decrease them in the back of the hat on both sides from the beginning of the row, retreating 10 loops from it.
We periodically try on the hat and, having not knitted the front 2 rows of the hat to the desired length, we begin to design the muzzle.
This is my moment

Next, we begin to knit the row as usual, without knitting 13 loops to the middle, we attach the white thread as follows
do not finish the last double crochet with orange color

We stretch the white thread


We knit 13 dc in white, then 3 dc in the central loop of the corner, 13 dc, attach the orange thread in the same way and knit the remaining double crochets. Next, break the thread and knit in straight and reverse rows. Above the white columns we also knit in white. We get

If you try on the hat, you will see that although the length of the hat is normal in the front, it is insufficient in the back, and the ears are not covered, so then we only knit the orange part. At the beginning and at the end of the row we knit in straight and reverse rows symmetrically according to the pattern

This way we will get sufficient length at the back of the hat and covered ears.
Next we knit the chanterelle ears.
Outer ear
12 ch
1st - 4 row 12 single crochets (RS)
5th row decrease on each side 1 sc - 10 sc
6-8 row - 10 RLS
9th row - decrease 1 sc on each side - 8 sc
10-11 row - 8 RLS
Row 12 - decrease 1 sc on each side - 6 sc
Row 13 - 6 RLS
Row 14 - knit in black - decrease 1 sc on each side - 4 sc
Row 15 - 4 RLS
Row 16 - decrease 1 sc on each side
Row 17 - 1 RLS.
The inner ear is knitted in white in the same way, only we start with 11 ch, decrease and the number of rows is the same as in the outer part.
We get these details


What kid wouldn't love a playful hat in the shape of a cunning animal? She is funny, bright and very original. Thanks to our master class on knitting a fox hat, you can create such a headdress at home. Working on the product will be very interesting, you won’t even notice how time flies by.
Prepare for knitting
- orange, white, black and green yarn;
- hook No. 5;
- needle;
- regular thread.
Crochet fox hat - pattern and step-by-step description of knitting
- We form the base of the product with double crochets. First, we collect 12 columns and connect them into a ring. Then in each line we add 12 more columns. The second row should have 24 stitches, the third – 36. We form two double crochets into one loop, then add 1 stitch, and so on until the end of the row.
Scheme for creating a header
- In the 4th line we add according to the scheme - a column, a column, 2 columns in one loop, etc. In the center of the circle we knit as many as 5 double crochets in one loop to form an angle for the muzzle. After which we make the usual increases.
- Line 5 consists of three stitches in a row, 2 double crochets in one loop, etc. We work a group of 5 double crochets in one loop like this: we create the first two double crochets as usual, on average we make 3 double crochets, then 2 more regular double crochets.
- We start line 6 with 4 regular double crochets, after which we form 2 double crochets in one loop. In a segment of 3 stitches we knit 1 double crochet, in the second – 3 stitches, in the third – 1 stitch. Next we use the usual increments. We continue knitting in increments of 12 loops in each line, duplicating the middle part from the 6th row.
- As a result of the work done, we should get a circle with a diameter of 11-12 cm (for a head volume of 48 cm). After this, we again make increases of 12 columns per row, the middle part is similar to the 6th row.
- When the desired length of the hat is reached, we begin to reduce the number of loops. We make a decrease in the back of the product by 2 columns, retreating slightly from the beginning of the row. Slightly short of knitting to the required length, we decorate the face of our fox.
Fox face
- We knit with double crochets, we do not knit 13 loops to the middle. We attach a white thread, we also do not knit the last column in orange.
We use double crochets
Add white yarn
- Using white we create 13 stitches, place the next 3 stitches in the central loop of the corner, repeat 13 stitches again, after which we attach the orange yarn and form the work further. We break the thread and knit in straight and reverse rows.
Making the white bottom of the muzzle
- We finalize the edge of the eyelet (in the canvas itself) according to the diagram.
Diagram for forming the edge of the ear
- We make the outer eye from 12 air. loops From rows 1 to 4 we form 12 single crochets, in row 5 we decrease 1 stitch on each side. From rows 6 to 8 we knit 10 stitches. In the 8-9th row we make a similar reduction so that there are 8 loops in total. Row 10-11 consists of 8 stitches, 13 – of 6, 15 – of 4, 17 – of 1 loop. In line 12 we reduce to 6 stitches, in line 14 – to 4 stitches, in line 16 – to 1. We do the inner ear in the same way, only we start working with 11 air loops.
Outer and inner ears of a chanterelle
- Connecting the inner and outer ear.

I continue to knit hats for my future baby. I have already knitted the Owl hat. A description of its knitting can be found here. The owl is designed for ages 3-6 months. The Chanterelle hat is knitted for ages 6-18 months. Until 3 months I plan to knit a couple of warm caps. I'm still learning about caps.
I knit the hats warm, so in two threads.

I start knitting the bottom - this is a circle of a certain size, each age has its own diameter (the table can be viewed heretvorlen.ru/2013/09/11/chepchik-s-ushkami/. For the age I chose, 6-18 months, the diameter of the bottom should be 12 cm. I knit with single crochets according to the pattern:
Cast on 1 VP and knit 6 sc into the second one from the hook.
1 row. 2 sc from each loop - 12 sc in total)
2nd row. (1 sc, increase)x6 - 18 sc
Row 3 (2 sc, increase)x6 - 24 sc
Row 4 (3 RLS, increase)x6 - 30 RLS
Row 5 (3 RLS, increase)x6 -36 RLS
and so on until the desired circle size.
Next, he ties the bottom with single crochets without adding or subtracting anything, measuring the height of the cap along the way. For the age I chose, 6-18 months, this is 15 cm. Without adding 2 centimeters in height, I change the orange thread to white and knit the remaining height with a 1x1 elastic band. You can watch a better video on how to knit an elastic band. There are a lot of them on the Internet. Type crochet rib into a search engine and a lot of information will appear. It's better to learn via video. I couldn’t understand it from the description and photo, but the video is very clear and intelligible. The elastic band is knitted very simply.


The ears for the crown are knitted in doubles, two white and two red triangles (cast on a chain of the required length and knit sc in rows back and forth until the rows reach the corner). Fold the white and red corners and tie with red on both sides. Sew hats onto the top of the head.
An interesting and bright children's hat Fox (“Fox”) from Caron, which is crocheted, will appeal to both little girls and boys. You can show off such a new thing to your peers, and it’s very pleasant to wear it yourself.
Sizes 6/12 months (18/24 months - 4 l - 6/8 l)
Head circumference:
6/12m = 43 cm
18/24m = 45.5
4 g = 48 cm
6/8l = 49.5 cm
Yarn from Caron acrylic Simply Soft (170 g/288 m) for all sizes, 1 skein of each color:
- orange (MC) - (Pumpkin 9765)
- white A-O (ff White 9702)
- black B - (Black 9727)
Hook 4 and 5 mm.
Sample: 13 half-dc (half double crochet) and 11p = 10 cm with a 5 mm crochet hook.

Note: at the beginning of each circle, 2 lifting air loops are NOT counted as half a chain stitch.
Knitting children's hat "Fox" crochet:
We work with a 5 mm crochet hook. Using MS (orange) thread, cast on 4 chain stitches and connect into a ring, knit a connecting loop in the first half of the stitch. (you need to finish each circle this way).
1st round row: 2 chain stitches, 8 half columns.
2 round row: 2 air stitches 2 half-column dc in the first half-column dc * 2 half-column dc in the next half-column dc. Repeat from * in a circle -16 half column.
3rd circle: 2 air.pt., 2 half-column dc in the first half-column dc * 1 half-column dc in the next half-column dc, 2 half-column dc in the next half-column dc. Repeat from * to the last half-column.sn, 1 half-column.sn to the last half-column.sn - 24 half-column.sn.
4 round rd: 2 air.pt., 2 half-column dc in the first half-column dc * 1 half-column dc in the next 2 half-column dc, 2 half-column dc in the next half-column dc. Repeat from up to the last 2 half columns. 1 half-column dc in the last 2 half-column dc - 32 half-column dc.
5 circles: 2 chains, 2 half-column dc in the first half-column. Repeat from * to the last 3 half-column dc, 1 half-column dc in the last 3 half-column dc – 40 half-column dc
6 circle.rd: 2 air.p., 2 half-column.dc in the first half-column.dc * 1 half-column.dc in the next 4 half-column.dc, 2 half-column.dc in the next half-column.dc. Repeat from * to 4 half columns. 1 half-column dc in the last 4 half-column dc - 48 half-column dc.
For 6/12 months only:
7 round row: 2 air stitches, 2 half-column dc in the first half-column dc * 1 half-column dc in the next 11 half-column dc in the next half-column dc. Repeat from * to the last 11 half columns. 1 half-column dc in the last half-column dc - 52 half-column dc.
For 18/24 months, 4 years and 6/8 years only:
7 round row: 2 chain stitches. 2 half-column dc in the first half-column. Repeat from * to 5 half-column dc, 1 half-column dc in the last 5 half-column dc = 56 half-column dc.
For 4 years and 6/8 years only:
8 row: 2 chain stitches, 2 half-column dc in the first half-column dc, [1 half-column dc in the next 27 (13) half-column dc, 2 half-column dc in the next half-column dc] - 1 ( 3) times. 1 half-column dc in each of the last half-column dc = 58 (60) half-column dc.
For all:
Next round row: 2 chain stitches, 1 half-column dc in each half-column dc row.
Repeat last round without increments until 12.5 (14-14-
15) cm, attach thread A (white) at the end of the last round row.
Cut the MC thread (orange)joining A at end of last rnd.
Using thread A (white), knit up to 18 (19-20.5-21.5) cm.
Finish.
Ears:
Inner ear:
Crochet 4 mm. With thread A (white) we dial 2 air.pl.
1rd: L/S). 5 columns s1.n in the 2nd air space. To turn.
2nd row: 1 air.pl., 1 column.c1.n in the first 2 columns.c1.n, 3 columns.c1.n in the next column.c1.n, 1 column.c1.n in the next 2 columns. c1.n. Rotate = 7 columns.c1.n
3rd row: 1 air.p., 1 column.c1.n. in the first 3 columns.c1.n., (1 column.c1.n., 1 half-column.c1.n., 1 column.b.n., 1 half-column .c1.n., 1 column.c1.n) - in the next loop, 1 column.c1.n in the next 3 columns.c1.n. To turn.
4rd row: 1 chain stitch, 1 column c1.n in the next 5 loops, (1 column c1.n., 1 half column c1.n., 1 column bc.n., 1 half column c1. n., 1 column.c1.n) - in the next loop, 1 column.c1.n in the next 5 columns.c1.n. To turn.
5rd row: 1 chain stitch, 1 column c1.n. in the next 7 loops, (1 column. c1.n., 1 half column. c1.n., 1 column. bz.n., 1 half column. c1. n., 1 column.c1.n) - with the next loop, 1 column.c1.n in the next 7 columns.c1.n. To turn.
6rd row: 1 chain stitch, 1 column c1.n in next 9 loops, (1 column c1.n., 1 half column c1.n., 1 column bz.n., 1 half column c1. n., 1 column.c1.n) - with the next loop, 1 column.c1.n in the next 9 columns.c1.n.
Complete.
External ear:
We crochet with 4 mm MC thread (orange), as for the inner ear.
We connect the parts: Fold both parts, use a 4 mm hook and thread B (black) to join the connecting loop to the first column c1.n.
1rd row: 1 chain stitch, knit, grabbing loops from both parts, 2 sts. c1.n in the first st. c1.n, 1 st. n in the next column.c1.n, 1 column.c1.n in the next 10 columns.c1.n, 2 columns.c1.n in the last column.c1.n.
Nose
Using a 4 mm crochet hook and thread a B in black) we cast on 2 chain stitches.
1 krg.rd: (3 columns.s1.n., 1 half-column.s1.n., 1 column.bz.n., 1 column.s2.n., 3 half-columns.s1.n., 1 without.column. c1.n., 1 column.c2.n, column.bz.n, 1 half column.c1.n) – in the 2nd chain loop on the hook. Connect the loop to the first column of the 1st row.
Complete.
Sew eyes, ears and nose to the hat. Embroider the mouth in 2 them B (black), as shown in the photo.

DOG Ginger
DOG Ginger
You will need: about 100 g of leftover multi-colored yarn; crochet hook (the number depends on the thickness of the yarn), 2 buttons for the eyes; padding polyester; wire.
Weave: art. without crochet; Art. double crochet
DESCRIPTION OF WORK.
For PAWS, use white yarn to knit a chain of 4 chain stitches. and close them in a ring st. without a crochet. Tie 6 tbsp into the resulting ring. without a crochet. Continue working in a circle in a spiral, knitting from one st. without a crochet and from the next st. 2 tbsp. Single crochet until you count 21 stitches in the circle. without a crochet. Then knit 2 rounds without increasing. *On the next row, knit **1 st. without a crochet, from the next 2 tbsp. of the previous row, knit 1 tbsp. without a crochet**.
From ** to ** repeat 3 times, finish the row with st. without a crochet. Work the next row st. without crochet.* From* to* repeat 1 more time (= 15 single crochet stitches in circle).
Knit 7 rows of st. without a crochet. In the next row, make increases by knitting from every 5th st. previous row 2 tbsp. without a crochet.
Work 1 row without increasing, and in the next row make increases by knitting from every 6th stitch. previous row 2 tbsp. single crochet (= 21 single crochet stitches in circle). Knit
7 rows st. without a crochet. In the next row, decrease by knitting every 5th and 6th stitch. previous row 1st st. without a crochet. Knit 1 row without increasing, and in the next row make decreases, knitting every 4th and 5th stitch. previous row 1st st. without crochet
(= 15 single crochet stitches).
Knit 8 rows of st. without a crochet. *On the next row, knit **1 st. without a crochet, from the next st. of the previous row, knit 2 tbsp. without crochet **. From ** to ** repeat 3 times, finish the row with st. without a crochet.
Work the next row st. Single crochet.* From * to * repeat 1 more time (= 21 single crochet stitches in circle). Knit 1 more row of st. without crochet, stop without breaking the thread.
Fill the resulting blank with padding polyester and insert the wire into it. Then knit the foot, completing 2 rows, knitting 2 tbsp. single crochet together and finish the work. For the second pair of legs, knit another similar piece.
TORSO. The basis of the body are the legs; it is enough to intercept them in the middle with a crocheted ring. Tie a chain of 5 chain stitches with colored yarn. and on its basis knit 4 tbsp. without a crochet. Having knitted 60 rows of st. without crochet, tie the resulting strip in a circle with yarn of a different color in the 1st row of st. without a crochet.
Sew the strip into a ring and pull it over your legs.
Knit 4 circles of colored yarn using your FEET. For one circle, tie a chain of 3 chs, close them into a ring, tie them with the 1st row of 8 sts. without a crochet and the 1st row of them is 15 tbsp. double crochet Sew the resulting circles like feet using yarn of the same color and embroider the toes with the same yarn.
HEAD OF A MAN (in a hat).
DESCRIPTION OF WORK. Tie a chain of 4 chs with brown yarn, close it around, tie it with a 6th st. Art. without a crochet. Then knit in the round, knitting from every 2nd st. single crochet 2 tbsp. Single crochet until you get a circle 20 stitches wide. without a crochet. Then double every 5th stitch until you have a circle of 40 stitches. without a crochet. Knit 7 rounds straight, using white yarn for the first 2 rounds. Then knit, knitting every 4th and 5th stitch. without crochet 1st tbsp. Single crochet until 20 tbsp remain in circle. Then knit, knitting with one st. every 2nd and 3rd st. As you work, fill your head with padding polyester.
CHEEKS are knitted separately. Using white yarn, knit a chain of 4 chs, close them in a circle and tie the 6th st. without a crochet. Then work, doubling every 2nd stitch, until you have a round of 30 stitches. Knit 1 row without increments with white yarn and 1 row with brown yarn. Fill the cheeks with padding polyester and sew to the head.
NOSE. Knit a chain of 4 chs with eggplant-colored yarn, close it in a circle, knit 6 tbsp into it. Single crochet, then work, doubling every other stitch, until you have 10 stitches. Work 1 round straight, then decrease every 2nd stitch. without a crochet. Stuff the nose with padding polyester and sew it on. Embroider the mouth with the same yarn.
EARS. Knit a chain of 4 chs with eggplant-colored yarn, and based on it, knit 8 rows of sts. without a crochet, cutting 1 tbsp in the last 2 rows. Tie the ear in a circle with the 1st row of stitches. without a crochet. Tie the other ear in the same way. Sew on the ears.
HAT. Using yellow yarn, knit a chain of 4 chs, close them in a circle and tie the 6th st. without a crochet. Then work, doubling every 2nd stitch, until you have a round of 350 stitches. Work 6 rows without increasing, then double every 3rd stitch. and knit 2 rows without adding. Embroider flowers on the hat. Sew the hat to your head.
Latest site materials
Cosmetology
The largest selection of fashionable sweaters with braids
Data for size 40/42 are given in parentheses. If one value is given, it applies to both sizes. Patterns for knitting women's sweaters with braids. Stockinette stitch: knit. R. – persons p., out. R. - purl p., in circular rows - all persons. Purl stitch: knit. R.
Cosmetology
Funny hat in the shape of a fox
Hello!!! Yesterday I finished a fox hat for my youngest daughter - she’s such a cunning one))) As always, I came up with it as I knitted))) I couldn’t find one like this on the Internet anymore))) Here is the result of my labors (I tied the base 3 times) Closer look at the muzzle)) ) Knitted from
Horoscope

How does pregnancy termination occur with medication? Is it possible to do it with medication?
The most gentle way to perform an abortion is medical termination of pregnancy. It is practically safe for the health and emotional state of a woman. To carry it out, drugs are used that provoke the expulsion of the fertilized egg. What
Cosmetology
Everyday look in the style of Kim Kardashian: makeup Video: master class on creating Kim Kardashian makeup
Paris Hilton's bosom friend and no less scandalous person than all those who became famous thanks to intimate videos, Kim Kardashian, is constantly trying to prove to the world that she is not at all who she is represented... So far, it’s hard to believe, because
Experience
Knitting a scarf-collar: how to knit correctly according to patterns with photos and videos Children's collar with knitting needles for beginners
A snood, or as it is also called a tube scarf or a scarf-collar, is a scarf that is closed in one ring. It can be of different widths and lengths. This accessory is once again confidently winning the hearts of modern fashionistas. Although the main function of a scarf is to protect
Cooking
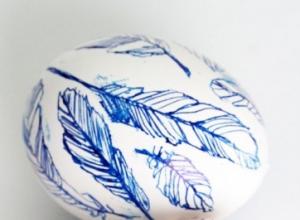
Decorating Easter eggs with your own hands How to decorate eggs for Easter in a fun way
Easter is one of our favorite family holidays. Because we really love the preparation process, when we need to paint Easter eggs, knead the dough for Easter cakes and come up with something to decorate them with. And for the last couple of years, thanks to Pinterest and the rest of the Internet, and