DIY Easter basket made of thread. Basket “Heart” made of threads and toothpicks Basket made of a ball and glue
Hello, friends!
You've probably come across information more than once on how to make three-dimensional balls from thread and glue.
What we need for this:
- Balloon;
- Jute thread;
- PVA glue;
- Scissors;
- Masking tape;
- Hot glue.
Step 1.
First, you need to inflate a balloon of the size you need; the size of the basket and the amount of thread required will depend on it, respectively. And then, you need to wind the thread around the ball in a chaotic manner - the more layers there are, the stronger the craft will be.


Step 2.
Pour PVA glue into a small container, since the glue itself is thick and will not saturate the thread well, add a little water to it and stir thoroughly.

Step 3.
Carefully, with a brush, apply the resulting adhesive solution to the entire thread wound around the ball so that it is well saturated. We hang the ball and wait for the glue to dry.


Step 4.
The glue has dried and now you can remove the balloon from the thread ball, or you can remove it later, when we cut off unnecessary parts from our workpiece.

Step 5.
Using masking tape, we delimit the shape of our future basket and cut off the two extra parts with scissors. The photo below clearly shows what needs to be done and how.


Step 6.
Since the edges of the basket turned out to be not quite even and ugly, they need to be refined somehow. This can be done by gluing a previously woven braid of jute thread to these edges with hot glue. You can act at your own discretion.


The basket is ready now, it can be decorated, for example, with artificial or real plants and flowers, or you can put it on the table on Easter and decorate it beautifully with decorative or real Easter eggs - there are a lot of options))).

Please don't forget to share our articles on social networks, it's important to us!
Step-by-step instructions on how to make a ball from threads:
1. Inflate the balloon to the desired size. Wrap a thread around the tail of the ball with a reserve of ~10 cm - for the future loop on which the ball will subsequently be hung to dry.
2. Lubricate the surface of the ball with Vaseline to make it easier to detach from the glued threads.
3. Soak the threads with glue. When using threads of different colors, very beautiful weaves are obtained.
There are several ways:
Pour the glue into some container that is convenient for you to work with, and soak the threads in it for 5-10 minutes. Dilute PVA glue with water (1:1) before soaking, as it is too thick. Make sure that the threads do not get tangled when soaking.
Take a tube of glue and use a hot needle to make two holes in it opposite each other. Thread a thread through the holes using a needle (when pulled through the tube, the thread will be smeared with glue). Instead of a bottle of glue, you can take a Kinder Surprise egg, or another small plastic bottle, for example, a medicine bottle or the same silicate glue, and pour the glue into it.
Wind the dry thread around the ball (skip step 4 and go straight to step 5), and then thoroughly saturate it with glue using a brush or sponge.
4. Secure the end of the thread soaked in glue to the ball (to secure the thread to the inflatable ball, you can use adhesive tape, tape, or protective tape). Then randomly wrap the thread around the entire surface of the ball, like a ball - each turn in the opposite direction. If the threads are thick, make fewer turns; if the threads are thin, wind them more tightly. Hold the threads in your hands with a slight tension, and also make sure that the thread is well wetted with glue. If the can runs out of glue, refill it.
5. After winding, once again leave a long tail for the loop, winding it again around the tail of the ball, cut the thread and hang the ball wrapped in threads to dry. Dry the ball thoroughly for 1-2 days - the finished cocoon should be hard. Do not try to speed up the process by hanging the balloon next to a heating device - the rubber from which balloons are made does not like this, and the hot air may burst the balloon. An indispensable thing for drying is a clothes dryer with clothespins. You can dry several balls on the dryer at once without them sticking together.
6. When the glue has completely dried and hardened, the balloon must be removed from the web craft.
There are two ways:
1. Peel the ball off the web using a pencil with an eraser at the end. Carefully pierce the ball with a needle in several places and remove it or what is left of it.
2. Untie the knot that tied the balloon and it will gradually deflate. This method is mainly practiced when, instead of a balloon, you used an inflatable ball as the basis for winding.
7. Glue the finished cobweb balls together with a hot gun, pressing the gluing area slightly inward. The balls can also be sewn together, but this is not easy, because the balls become very strong and hard when dry.
8. Decorate the resulting design using beads, beads, feathers, braid, ribbons, artificial flowers, or any other materials at hand. Cover with paint. To do this, take a can of paint and go out onto the balcony or into the yard. With a slight movement of your hand, direct the colorful streams towards the balls awaiting a miraculous transformation. Create a snow effect: moisten the balls with glue and dip them in semolina or powdered sugar. Spray the ball with glitter hairspray. Don't expect much shine, but light sparkles are guaranteed.
Imagine...
small BIG tricks:
To prevent the table from getting dirty during the wrapping process, it is better to lay something plastic on it, not paper - everything will stick to the paper. Plastic coasters for hot dishes are suitable. If not, you can use a document corner made of thick plastic. The bottom seam is cut off, the folder is unbent and straightened, and it turns into a universal tool for saving the table from glue, paint and other creative deposits. In extreme cases, polyethylene is suitable for protecting the workplace.
Instead of glue, you can use sugar syrup or paste. Recipe for making paste: 4 teaspoons of starch per glass of cold water, mix thoroughly and bring to a boil.
Instead of thread, you can take thin copper wire and wind it around the ball in the same way.
To prevent glue from leaking through the hole in the floss tube, place a thin needle on the end of the floss and poke a piece of tape through it. Pull the thread in the opposite direction and firmly glue this tape to the jar. Thus, through a small hole in the electrical tape, the glue will not wet the thread so abundantly and will stop randomly dripping from the thread onto the table and clothes.
Be careful when winding the kokan. When dried, a poorly tied cocoon cracks and loses its shape as the ball descends.
Spider web balls can be not only spherical in shape. As a basis for winding, you can take a cone-shaped object (roll thick paper or cardboard into a cone), a heart, etc.
If you decide to change the color of a thread ball, then it is best to paint the ball before deflating and removing its base - so that the web does not become wrinkled when painting. In addition to aerosols, it is convenient to apply paint with a small sponge, but inconvenient with a brush and takes much longer.
To make the surface of the ball textured, you can coat the balls with glue and roll them in cereals, for example, millet or coffee beans.
And a few more words about threads...
If an air structure is being prepared, then the threads should be thin and light. For flower pots, it is better to take thick threads or even ropes and do not skimp on glue. The thread color can be any. True, it depends on the glue used. When the glue is transparent and leaves no traces, you can experiment by wrapping the ball with threads of different shades. It will turn out even more interesting.
Useful tips
Crafts for Easter from different materialsEaster is one of the most important and beautiful church holidays, which is loved not only by believers. This year Orthodox Easter is celebrated quite late - 5 May. This means you will have more time to prepare for it, to do interesting crafts, gifts and decorations for family and friends.
Most popular the symbol of Easter and the rebirth of new life is the egg. Chicken eggs are painted in all sorts of colors, decorated with designs and patterns, and given to each other as edible gifts. You can read more about Easter eggs and how to paint them. But you can make eggs with your own hands.
DIY Easter eggs
Making an Easter egg craft with your own hands is not that difficult. To do this, you don’t need to be a famous Faberge master or have unique artistic abilities. All you have to do is attach a little patience and imagination.

For work we will need:
Construction plaster (alabaster)
A saucepan for diluting the solution
Measuring cup
Funnel
Spoon and knife
Plastic egg, consisting of 2 halves, or regular chicken eggs

Let's get started:
1) Make a hole on the blunt side of the egg for pouring plaster using knife or scissors. If your plastic egg has holes on the sharp side, cover them with tape. You can also use it as a form regular egg shell, from which the contents should be poured.

2) Dilute gypsum with water at the rate 5 heaped tablespoons of gypsum per 180 ml of water. You should have the consistency of liquid sour cream without lumps so that the liquid can be poured into the egg.


3) Pour plaster into the hole of the egg and leave it to dry for an hour, then remove the plastic halves or clean the shell.

4) As a result, you should have perfectly shaped plaster egg, which is ready for further processing and any possible decorations.

DIY Easter eggs (Video)
How to make Easter eggs from threads?
One of the easiest ways to get an original Easter egg craft is braid the shape with threads and glue. Typically used as a form balloon, which can be easily removed, leaving a wicker frame. You can also vary the size of the egg itself by inflating the balloon more or less.

For work we will need:
Balloon
PVA glue or starch with water
Drying rack
Details for decorations
Let's get started:
1) Inflate a balloon of the desired size and tighten it well with a thread so that no air passes through.

2) Wet the threads with glue and wrap them around the ball so that holes remain.

3) When the ball is completely wrapped, place it on the stand and let the glue dry within 24 hours.

4) After drying, pierce the ball with a needle and pull it out through the holes. The thread frame will retain its shape.

5) To decorate the resulting string egg, you can use colorful ribbons, buttons, beads, toys and much more.

6) Using your imagination, you can get these original Easter crafts:

Easter eggs made of beads
Beading For some, this may seem like a rather difficult task, requiring a lot of time and patience. But with the help of small beads you can decorate an artificial or natural Easter egg in just a couple of minutes without complex techniques.

For work we will need:
Beads or decorative sprinkles in the form of balls
Glue and brush
Capacity
Drying rack
Details for decorations

Let's get started:
Coat natural or artificial eggs with glue and roll well in beads or sprinkles.

Sprinkles can usually be found in stores, baking decorations, and are often used to decorate Easter cakes and other sweets.

If you have very small beads, you can roll the egg in them, however, for this purpose you are better off using artificial eggs – wooden or plaster so that they serve as decoration for a long time.

If you still want to learn how to weave beaded jewelry, you can use the following video tutorials on beading:
Easter eggs made of beads master classes (video):
Easter eggs made from pasta
There are a great variety of Easter egg decorations, but we would like to offer the most simple and original decorations that are easy to make at home.

For work we will need:
Wooden eggs or shells without contents
PVA glue and brush
Drying rack
Small star pasta
Dry glitter

Let's get started:
1) Apply glue to the wooden egg and glue it to it in even rows raw star pasta. However, they can be arranged in any order you wish. Let the glue dry well.

2) Paint the eggs along with the stars with paint, decorate with glitter. In order for the glitter to stick well, apply glue to the egg in the right places, sprinkle with glitter, and after 15 minutes shake off any excess.

3) As a result, you should get an original, bright craft:

4) Eggs can be placed in an Easter basket decorated with feathers.

Easter egg stand
You can make the simplest Easter egg stand with your children from the simplest materials: cardboard, lace, corrugated paper.
For work we will need:
Not too thick cardboard or toilet paper roll base
PVA glue and brush
Lace
Needle and thread
Scissors
Details for decoration
Let's get started:
To make the first version of the stand, take toilet paper roll base and cut it into several pieces so that the stand is not too high.
From corrugated paper cut a wide strip and paste it onto cardboard in the form of a skirt.
Decorate on top soft wire or pieces of organza. You can also add bright details in the form of artificial paper flowers. You can read about how to make corrugated flowers.

In the second option, you replace corrugated paper lace, which with the help of a thread and a needle needs to be decorated in the form of the same skirt. Used as additional decoration string of pearl beads.

Easter wreath
You can make a simple Easter wreath with your own hands from egg cartons, as well as corrugated paper, ribbons, artificial flowers and other decorations.

For work we will need:
Empty egg cartons
PVA glue and brush
Scissors
Details for decoration
Let's get started:
1) Carefully cut out the core from the cardboard packaging and process it with scissors so that it turns out something like flowers with petals.

2) You should have enough of these “flowers” to put them one inside the other and get a wreath.

3) Use crepe paper string to make leaves and stems. Also use ready-made paper flowers. You can easily make flowers yourself or buy ready-made ones. Place the cardboard “flowers” one inside the other, interlacing them with paper flowers and leaves, fixes well with glue.

Easter wreath It will look great on a holiday table, or it can be hung on a door or wall as a decoration.

Easter egg or Easter napkin for the holiday table
This original napkin not only serves as a decoration for the holiday, it can be presented as a gift to loved ones, filled with Easter eggs and sweets.

For work we will need:
Colored cotton fabric
Lace
Scissors
Ruler and chalk
Sewing machine
Nonwoven
Pins
Let's get started:
1) Prepare 6 identical circles made of fabric with a diameter 40 centimeters. Each circle needs to be glued with non-woven fabric so that the resulting product keeps its shape well even after you wash it. If you can't find interlining, you can do without it, but use thicker fabric.

2) Fold two circles with the wrong sides facing each other and trim the edges with lace. In the end you should be able to three rather dense rag round blanks.

3) Fold the three pieces together and secure them with pins. Then, using a ruler and chalk, draw four even lines, thus dividing the circle into 8 equal parts. Using a saucer, trace the center with chalk.

4) Stitch along the chalk lines, stitching all three circles together.

5) Using a needle and thread, make wide stitches around the core, capturing the top two layers. Then pull the thread and tie it with a knot. In the diagram it will look like this:

You need to tighten the thread so that the upper layers straighten and rise a little:

6) Place in the egg wells painted eggs, and on top you can put Easter cakes, cookies, candies or any other sweets. You can add a couple of details from lace scraps.

DIY Easter basket for eggs
This simple basket can be made using scraps of construction paper. Even children will help you with this.

For work we will need:
Colored paper (thick)
Stapler
Scissors
Ruler and pencil
Let's get started:
1) For the base of the basket, cut 5 strips of paper length 25 and width 3 centimeters. Fold them side by side vertically, and in the upper part, using glue and a stapler, attach a horizontal strip-rim of a different color, the size of which should be 30 by 2 centimeters. There should be 2 more strips like this.

2) Fold the headband into a circle and secure it with a stapler on the opposite side.
1. Inflate the balloon to the desired size. Wrap a thread around the tail of the ball with a reserve of ~10 cm - for the future loop on which the ball will subsequently be hung to dry.
2. Lubricate the surface of the ball with Vaseline to make it easier to detach from the glued threads.
3. Soak the threads with glue. When using threads of different colors, very beautiful weaves are obtained.
There are several ways:
Pour the glue into some container that is convenient for you to work with, and soak the threads in it for 5-10 minutes. Dilute PVA glue with water (1:1) before soaking, as it is too thick. Make sure that the threads do not get tangled when soaking.
Take a tube of glue and use a hot needle to make two holes in it opposite each other. Thread a thread through the holes using a needle (when pulled through the tube, the thread will be smeared with glue). Instead of a bottle of glue, you can take a Kinder Surprise egg, or another small plastic bottle, for example, a medicine bottle or the same silicate glue, and pour the glue into it.
Wind the dry thread around the ball (skip step 4 and go straight to step 5), and then thoroughly saturate it with glue using a brush or sponge.
4. Secure the end of the thread soaked in glue to the ball (to secure the thread to the inflatable ball, you can use adhesive tape, tape, or protective tape). Then randomly wrap the thread around the entire surface of the ball, like a ball - each turn in the opposite direction. If the threads are thick, make fewer turns; if the threads are thin, wind them more tightly. Hold the threads in your hands with a slight tension, and also make sure that the thread is well wetted with glue. If the can runs out of glue, refill it.
5. After winding, once again leave a long tail for the loop, winding it again around the tail of the ball, cut the thread and hang the ball wrapped in threads to dry. Dry the ball thoroughly for 1-2 days - the finished cocoon should be hard. Do not try to speed up the process by hanging the balloon next to a heating device - the rubber from which balloons are made does not like this, and the hot air can cause the balloon to burst. An indispensable thing for drying is a clothes dryer with clothespins. You can dry several balls on the dryer at once without them sticking together.
6. When the glue has completely dried and hardened, the balloon must be removed from the web craft.
There are two ways:
1. Peel the ball off the web using a pencil with an eraser at the end. Carefully pierce the ball with a needle in several places and remove it or what is left of it.
2. Untie the knot that tied the balloon and it will gradually deflate. This method is mainly practiced when, instead of a balloon, you used an inflatable ball as the basis for winding.
7. Glue the finished cobweb balls together with a hot gun, pressing the gluing area slightly inward. The balls can also be sewn together, but this is not easy, because the balls become very strong and hard when dry.
8. Decorate the resulting design using beads, beads, feathers, braid, ribbons, artificial flowers, or any other materials at hand. Cover with paint. To do this, take a can of paint and go out onto the balcony or into the yard. With a slight movement of your hand, direct the colorful streams towards the balls awaiting a miraculous transformation. Create a snow effect: moisten the balls with glue and dip them in semolina or powdered sugar. Spray the ball with glitter hairspray. Don't expect much shine, but light sparkles are guaranteed.
Imagine...
small BIG tricks:
To prevent the table from getting dirty during the wrapping process, it is better to lay something plastic on it, not paper - everything will stick to the paper. Plastic coasters for hot dishes are suitable. If not, you can use a document corner made of thick plastic. The bottom seam is cut off, the folder is unbent and straightened, and it turns into a universal tool for saving the table from glue, paint and other creative deposits. In extreme cases, polyethylene is suitable for protecting the workplace.
Instead of glue, you can use sugar syrup or paste. Recipe for making paste: 4 teaspoons of starch per glass of cold water, mix thoroughly and bring to a boil.
Instead of thread, you can take thin copper wire and wind it around the ball in the same way.
To prevent glue from leaking through the hole in the floss tube, place a thin needle on the end of the floss and poke a piece of tape through it. Pull the thread in the opposite direction and firmly glue this tape to the jar. Thus, through a small hole in the electrical tape, the glue will not wet the thread so abundantly and will stop randomly dripping from the thread onto the table and clothes.
Be careful when winding the kokan. When dried, a poorly tied cocoon cracks and loses its shape as the ball descends.
Spider web balls can be not only spherical in shape. As a basis for winding, you can take a cone-shaped object (roll thick paper or cardboard into a cone), a heart, etc.
If you decide to change the color of a thread ball, then it is best to paint the ball before deflating and removing its base - so that the web does not become wrinkled when painting. In addition to aerosols, it is convenient to apply paint with a small sponge, inconvenient - with a brush and takes much longer.
To make the surface of the ball textured, you can coat the balls with glue and roll them in cereals, for example, millet or coffee beans.
And a few more words about threads...
If an air structure is being prepared, then the threads should be thin and light. For flower pots, it is better to take thick threads or even ropes and do not skimp on glue. The thread color can be any. True, it depends on the glue used. When the glue is transparent and leaves no traces, you can experiment by wrapping the ball with threads of different shades. It will turn out even more interesting.


Take a regular A4 sheet of cardboard (297 x 210 mm) and cut it in half crosswise. The size of the resulting sheet is A5 (210 x 148 mm). Cut out an egg-shaped shape from this sheet. In our example, we used white cardboard, but it will turn out even more beautiful if you take a sheet of cardboard of the same color as the thread with which you will then wrap the basket. Then the gaps between the threads, if they appear during the winding process, will not be so noticeable. Here's a little trick.

Now, using a pencil, draw another smaller oval inside this oval. Draw a line, retreating from the edge of the large oval by about 1-1.5 cm. But in the lower part of the oval, make a larger indent - 3-4 cm.

Cut out the shape along the drawn outline. You will get a basket with a long handle.


Now it's time for the threads. The thicker the thread, the better. Take the thread of the color you chose for the basket. Absolutely any will do, except perhaps green. Yes, and it is not suitable only if your flowers have leaves. If there are no leaves in your craft or if you simply do not have enough other threads, green will do. Even a gloomy black color will do if the flowers in the basket are large and bright.
How many threads do you need to wrap the entire basket? It is difficult to calculate, so it is better to use the entire skein. Our basket is large enough for it to easily fit through the inner hole when wrapping. If you don't feel comfortable working with a large skein, make a small ball - but it's extra work and time.
Start winding the thread around the basket in circles. Try to make each turn close to the previous one so that there are no gaps between them, otherwise the craft will look sloppy.
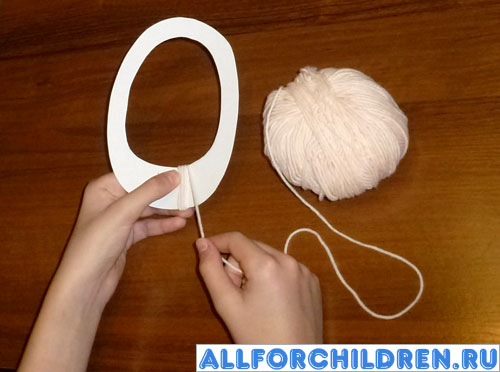
To prevent the thread from unraveling, it is better to temporarily secure its end, for example, with a paper clip.

As you wrap, tighten the thread from time to time, as it tends to gradually relax, and this again gives the craft a sloppy look.
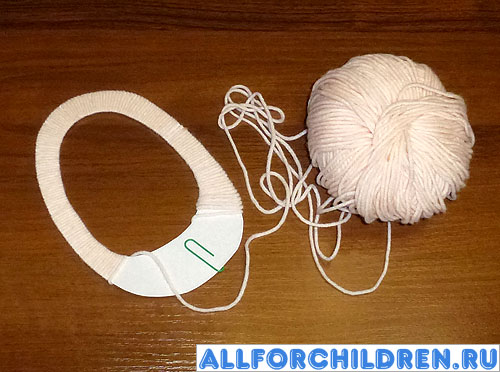
Having reached the place where you started wrapping, tie the ends of the thread with a regular double knot on the back of the craft and cut the ends short with scissors so that they are not visible.

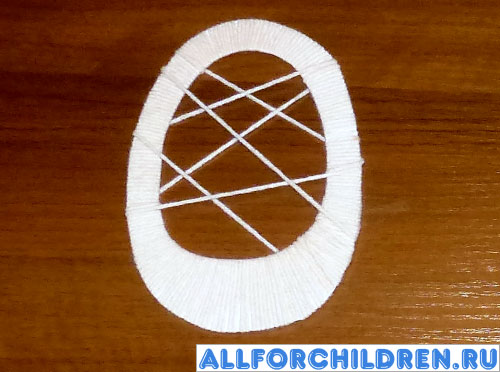
Take a thread of the same color again and wrap it around the handles of the basket according to the principle: from left to right, from top to bottom. Make something like a web in this way. There is no need to do too many turns: 4-5 will be enough. This “web” is needed not only for beauty, it will perform an important task: we will tie flowers to it with threads.
Try to wind the "web" so that the end of the thread returns to its beginning to tie them together, as we did with the basket winding.

To make flowers and leaves, cut out several circles and figurine in the form of drops from cardboard.

Now we need to do some delicate work: just as we cut out the inner contour of the basket, you will need to draw exactly the same figure inside each figure, stepping back from the edge by approximately 5 mm. Then you will need to cut them out along the drawn contours. It is best to use manicure scissors rather than ordinary paper scissors for this delicate work. You will get rings and “hollow” (empty from the inside) droplets.

Take woolen threads of bright colors and wrap them around the cut out parts. For each of them you will need about 60-100 cm of thread. In this case, cut a thread of this length from the skein for each part, preferably with a margin. If you didn’t calculate correctly and there wasn’t enough thread, it doesn’t matter: take another thread and tie their ends on the back of the part. Cut off the tails, and the junction will be almost invisible.

As in all previous cases, we finish wrapping in the same place where we started, tie the ends of the thread with a knot and cut off the protruding tails.

Tie the resulting parts to baskets in the form of flowers and leaves with threads of the same color as these parts. Tie them to the threads of the “web” and to the handles of the basket.
You can sew flowers with thin threads. Sew with small, invisible stitches.

The basket can be decorated with flowers, berries and leaves of various shapes. Imagine!
Latest site materials
")
Health

Do you agree with the statement: the only thing worth living for is children?
There is no place for lies in a serious, real relationship. Love can only rest on sincerity, trust and mutual respect. You can always sense falsehood, but how can you tell if a man is lying? In order to recognize this, it is enough to be observant. Human
Cooking

Coco Chanel Quotes and Sayings
On January 10, 1971, the style icon who turned the fashion world upside down, the creator of the little black dress and the legendary Chanel No. 5 fragrance, the magnificent Coco Chanel, died. She was known not only for her signature accessories and perfumes, but also for her interesting
Cosmetology

Midi dresses Beautiful midi dresses
The classic model of dresses of medium length is called “midi”...The classic model of dresses of medium length is called “midi”, and it should be in the wardrobe of any modern beauty. Midi dresses look elegant and formal, so they would be appropriate
Cosmetology

Interesting facts about Easter Briefly interesting facts about Easter
The egg is the main symbol of Easter, which means new life and rebirth for Christians. That is why it is an obligatory element of many Easter customs and games. The custom of giving each other colored eggs was not invented by Christians. This is what they did before
Experience

Embossed crossed crochet stitches in patterns for blankets, bags, pillows YouTube how to crochet a crossed double crochet
Crochet pattern - crossed columns. Different, different types of crossed columns. They are often used in Vanessa Montoro's vintage dresses, which is of particular interest to me. I think it’s not just me. Therefore, it’s time to knit dresses based on Vanessa Mo