Make a three-dimensional Christmas tree from colored paper. Paper Christmas tree: wonderful DIY crafts
Using templates, it’s easy to make original three-dimensional paper Christmas trees, which are equally good as New Year’s interior decor and homemade Christmas tree decorations.
To work you will need paper or thin cardboard, a template and scissors.
Volumetric Christmas trees made of paper: 3 options
1. Option
Despite its sketchy appearance, the Christmas tree looks beautiful and interesting. To make it, you will need a rectangular piece of paper that needs to be folded in half.

The width and length depend on the desired size of the Christmas tree, but it is important to take into account the template data so that it fits into the area of the paper folded in half.
Print the template and cut it out.

Then you can make the Christmas tree. But, this is if you have plain paper. You need to make a Christmas tree from cardboard as in my example, since not every printer can use thick paper. That is, trace the printed and cut out template on cardboard and cut it out again, but this time into a cardboard blank. Another option is to redraw it.

Please note that the straight dotted line should be on the fold of the paper. You should also cut along the lines from the fold side.
This is what you will get for a Christmas tree.

For further work, open it.

Then the cut strips need to be directed through one to the other side, making folds on the sides. That is, first bend the second strip inward.

Then leave the third unchanged, but direct the fourth strip in the other direction.

Repeat until you run out of stripes. Watch the side folds, it is advisable that they are even. The smallest one can be bent with a thin object - a pen rod, a kebab stick, etc. At the very end, bend the sides a little. You will get such a voluminous Christmas tree made of paper, stable on the surface.

Option 2
Another cute Christmas tree that is easy to make using a template.

Fold the paper in half and cut along all the lines except the dotted ones.

Open the workpiece.

Bend the strips to the other side, alternating them through one another.

The Christmas tree is ready.

3. Option
The template is not much different from the first one. The difference is that here the lines are straighter.
Use the template.

Cut out the paper blank.

Open it and direct the stripes in the other direction, alternating them through one another. Bend the sides.
Today you will learn how to make a three-dimensional Christmas tree out of paper with your own hands. This master class describes not just one voluminous paper Christmas tree, but several different craft options. Our ready-made templates will help you make them.
Tools and materials Time: 20-30 minutes Difficulty: 2/10
- printed Christmas tree templates on A4 paper;
- scissors;
- glue;
- acrylic paint and brushes;
- fluorescent paint (optional);
- sparkles, decorative snowflakes and other decor at your discretion.
A voluminous paper Christmas tree is a simple and very original way to decorate your home on the eve of Christmas and New Year!
These crafts are so simple that you can easily involve preschool and primary school children in making them! Surely, you will all have fun creating various compositions from 3D Christmas trees!
Detailed description with photo
We offer you four options for making a voluminous paper Christmas tree with your own hands, but if they are still not enough for you, you can experiment with the size of the trees or create your own template. The possibilities here are endless!
Option 1. Christmas trees with stars
The first option includes a large number of trees, so we suggest starting with it.
Initially print the templates below on A4 paper.
Template 1
Template 2
The first option assumes that you simply cut out the trees along the contour, and then cut recesses into them along the drawn lines.
Then you need to bend these strips in opposite directions through one. Thus, you have a finished three-dimensional paper Christmas tree in your hands!
For the second option, also cut out the trees along the contour. There are no drawn lines inside, which gives you the opportunity to experiment!
Here you can cut out arbitrary lines at the top and put stars below using a curly stapler. Or cut out thick lines and put stars between them, or cut out curved lines, or…. In general, your imagination will tell you, and in the photo below you can see what we came up with!
Option 2. Christmas tree with a fawn
If you want to move on to more complex compositions, try cutting out the Christmas tree with a fawn, the template for which is provided below!
Template 3
To make this Christmas tree, first cut out the fawn, then fold the Christmas tree paper in the middle and cut it out. After this, fold the paper for a small tree from the right edge and also cut it along the contour.
If desired, glue decorative stars and snowflakes on the tree, decorate with glitter, etc.
Option 3. Glowing volumetric Christmas tree
Print the template below on standard A4 paper.
Template 4
- Cut out the stars and use them as a template for the stars.
- Invite your child to cut out the Christmas tree. Let him cut out the tree along the contour and internal lines. Depending on your age, you may need a little help.
- Make sure all the lines inside are cut.
- Using green or any other paint you wish, paint the craft in 2 layers. Let it dry well both times between stainings.
- Fold the paper strips inside the tree in opposite directions to create a 3D look.
Stars: In this tutorial, we used glow-in-the-dark spray paint we found at our local craft store to make a 3D paper Christmas tree with a glowing effect. We simply sprayed paint onto paper and cut out stars from it.
Alternatively, you can buy ready-made glow-in-the-dark paper and cut out stars from it.
Glue stars onto your Christmas tree.
Your DIY voluminous paper Christmas tree is ready! We hope you enjoyed our step-by-step master class with templates.
Subsequently, you can use this craft as a small night light, but be prepared for the fact that it will not last you long!
And as a little surprise, we are attaching an interesting video to the master class, in which a professional decorator will tell you how to make a slightly different, but no less beautiful version of a three-dimensional paper Christmas tree with your own hands.
Hello, dear readers! I was decorating the apartment before the New Year and realized: a DIY Christmas tree could help in decorating the room. And not just one. And not alone
Of course, I had several ideas that I want to bring to life in the near future. But when I tried to find master classes on the Internet on how to create these wonderful creations. Oh, what are they used to make them? I wouldn’t have thought of using some materials at all. So today, together with you, I will admire the masterpieces of human imagination in the field of handmade Christmas trees!

DIY Christmas (and not only) trees: master classes
Almost all the Christmas trees presented today are made using different materials. Some are very unusual, artsy, rich. I would even say elite. And others, on the contrary, are as simple and minimalistic as possible in their design. A la Ikea, so to speak.
DIY paper Christmas tree
The largest group today. You will see many representatives of the beautiful spruce species. Each one is different from the others, so choose
Origami
The simplest version of a paper Christmas tree is using a square. Fold the square in half (diagonally), bend the opposite sides to the center (like in an airplane) and that’s it.
Tip: Use this simple trick to decorate a greeting card or fold napkins beautifully.

Angular
First of all, fold a square of paper as shown in the photo. Then:
- Fold the structure so that the side corners are inside. This will result in a square four times smaller than the original one.
- Bend the right corner to the center,
- And left.
- Fold the right corner to the right.
- Fold this corner under yourself.
- Do the same with the second one.
Now turn the structure over and repeat steps 2-6 only for this side. All that remains is to trim the sharp lower tip and make a few cuts on both sides. Then bend each cut end and place the Christmas tree on the table)
Circles
To create this spruce, take paper and draw a circle on it, outlining it as necessary, as in number 1. Next, cut out the circle and cut each section to a small circle. Now wrap each of these small sections on both sides with the tips inward and glue them together. Work the entire circle in this manner.
For spruce you will need several rows. In the photo, for example, you see a beauty made of 15 layers with a cone top. The layers, by the way, are assembled onto wire by piercing the centers of the parts.

Panel for kindergarten
In kindergarten, were you given the task of making a spruce tree together with your child? Then this option is the simplest. Take thick cardboard and colored paper. Cut triangles out of cardboard, cut the paper into strips and overlap them. Even a child can handle this. Cut off the excess. You can glue a skewer at the bottom and stick it into the padding polyester.
Tip: the resulting product can be used as a bookmark.

Making crafts using available materials
To create this semblance of a fluffy-coniferous creature, you will need a long metal pin on a stand and lots and lots of scrap paper. Feel free to use newspapers, old magazines, etc.
Tip: Additional decoration of the Christmas tree can be done using paint in a can, which can be sprayed on the leaves. This will make them stronger and more durable.

Big tree of knowledge
The next beauty will be the spruce tree that brings knowledge. For it you just need to stack all the available books in a pyramid. I highly recommend not hanging an electric garland, as in the photo: fires happen very often on New Year’s Day, so don’t neglect it. It’s better to put regular tinsel and balls on the ledges.

From tubes
Incredibly simple technology. Suitable for decorating cards and walls. Prepare several tubes rolled from paper rectangles. Glue each one in the intended place. The tubes can be made gradually smaller or with a “brush” (sometimes placing longer elements higher than necessary).
Glue button or sequin decorations on top.

Fluffy
For it you will need many, many paper strips, which will need to be glued in layers to a paper cone. And put on a cute cone hat on top. An excellent craft that can be done with children too.


For those who are passionate about quilling
Do you like to twirl paper spirals? Then prepare several strips of paper of the same thickness. Roll 17 pieces into a spiral and narrow one end of each. For the trunk, simply roll 4 tubes and place on a skewer. Glue all parts according to the photo. The ends of the “branches” can be decorated with cylinders of a different color, similar to Christmas tree decorations.

Vytynanka
I remember my sister once mentioned that she liked the so-called vytynanki - one of the types of Slavic folk art in which amazingly beautiful things are cut out of paper. They are often glued to glass to enhance the festive atmosphere.
And they are made like this: the desired pattern is drawn on paper in advance. In this case, a spruce tree folded in half. And then, using a well-sharpened stationery knife, all unnecessary parts are cut out. For the spruce you will need two parts folded in half, which can later be sewn in the center using a sewing machine or by hand.

Corrugated paper
Continuing the paper theme, I want to show you three simple Christmas trees. The first one, with blue roses, which are made of tissue paper (like corrugated paper, but much thinner). Each rose is created using a strip that is tightly curled at the center and slightly looser towards the end. Thanks to the properties of paper, roses easily straighten and become lush.
The base is again a cone.

The next spruce tree is very similar to the previous one, but here the strips used to create the flowers are cut along the edge, making them very fluffy. They are again rolled into a flower, but they do not try to give the appearance of a rose, but simply soak them as much as possible.

From cupcake tins
Well, that's an interesting idea. I have just a bunch of these molds that seem to never be useful to me (I’d rather buy silicone ones). Cut the bottom from each and cut from one edge. And stick it on a paper cone.
By the way, you can use scraps to make a flat Christmas tree for a postcard, as in the photo in the master class.

Fabric Christmas trees
Floral
This beauty will require a lot of circle flowers. For them, cut out several circles of fabric and burn the edges. It is better to take organza, veil or something similar. Then collect each flower on a string and decorate the center.
Spruce again from a paper cone at the base

From felt
To create these tree pendants, use soft (for the base) and thick (for other elements) felt and beads. Patterns can be made directly from the photo. All that remains is to cut out the parts from felt, which then need to be sewn with a running stitch and stuffed. Well, decorate, of course
You can give such a Christmas tree to a guy - it will be very touching

From satin ribbon
Prepare beads, satin or grosgrain ribbon (or maybe even lace?), thread and needle. All you need to do is string beads and ribbon loops onto the thread alternately. The main thing is not to forget to secure it at the beginning and end of the product.

From balls
The essence of creating this wonderful Christmas tree is to create a huge number of fabric balls. For each of them, cut out circles and tie them with thread, laying a running stitch. Put a little padding polyester inside and pull it off. Each such ball must be glued to the base.
The base can be a foam cone, a paper cone, or sewn from fabric. You can also decorate the spruce tree in the form of a topiary; for this you will also need a pot of polymer clay and sprinkles to create the effect of an earthen mound.

I came up with such a charm in a nautical style:

Other materials or need for invention is cunning
Sorry, dear readers, I in no way want to offend anyone. It’s just that this expression best describes the impossibly diverse number of materials with which people manage to create Christmas trees :))
From beads
A rather complicated, but interesting Christmas tree. To create it, prepare chopped beads, a couple of beads and thin wire for working with beads. First, string the top, as in photo 1. Then make four upper legs - this will be the top.
Now prepare the branches, in each of which make several loops - smaller for the upper branches, larger for the lower ones. Collect them all into one trunk, wrapping it across with thin wire.
From plastic bottles
I respect this master class for its respect for nature and waste recycling. Take a plastic bottle, cut off its smooth central part, which you cut into fringe. The lid will go on the top, the bottom can be used as a supply. Glue all the cut elements to the central rod.

From spools of thread
My friends, if you have a number of wooden thread spools, then know that you are the owner of a treasure with which you can make an amazing tree. To do this, clear all the spools of thread and glue the very bottom row onto a thick round base. Then glue row by row onto the existing ones below. Simple and stylish

From candy
The base will again be a paper cone. Attach a row of regular tinsel to it, then a row of sweets, then again tinsel, etc. You can glue the most delicious candy to the top (as a star). One minus - there will be nothing left of the tree quickly

From the bark
Strict Nordic Christmas trees. Which can be made if you have a paper cone and a little (okay, a little more than a little) bark on hand. The pieces need to be glued in rows so that the tree looks like a spruce.
I just ask that you don’t spoil living trees for this. Better look for something that has already been knocked down by a thunderstorm. By the way, the method with small pieces can also be used with CDs.

From sticks
Let's continue the theme of nature. This time we are decorating holiday boxes. Use chopsticks to lay out a semblance of a tree, which, in turn, decorate with threads, buttons and other decorative details.

From clothespins
I definitely need to make one like this for the New Year))) I have a dozen or two clothespins with hearts, it will be cool) In general, all you need is to build a rod with a stand. For example, a lid with a spoke. And put “branches” on the knitting needle. You can insert lollipops into the edges.

Bohemian
And we will make this spruce using feathers. The principle is the simplest - glue the feathers in rows from the bottom. By the way, feathers can be purchased in woven ones. But I don’t know what they used to paint it green. Maybe someone can tell me?

From wire
Build the frame like this: wrap three circles of wire around something round (cans, buckets, etc.), so that each next circle is smaller (or larger) than the previous one. Then take three pieces and use thin wire to tie them together at the top and in the same place on each circle.
All this can be wrapped in a beautiful garland. If you get creative, you can even hang a few Christmas tree decorations.

Made from mesh (and sisal)
Such a Christmas tree can be built in a few minutes. To do this, take a mesh or a sheet of sisal (read what it is). Place on a paper cone and wrap in several layers. Secure the top with a cord, wrapping it in a spiral around the spruce. Decorate with Christmas tree decorations.

And now is the time for the most minimalistic Christmas trees, which will decorate the house and will not take up much space.
Made from… Christmas balls
Here's a pun - a Christmas tree made of Christmas balls. Nevertheless, it looks great. For some reason I immediately imagined such a structure at some cool corporate event of a large company - it looks very status-worthy.
It’s not at all difficult to make one: take several dozen green (or whatever you want) balls and tie a thin thread or fishing line to each one. The most difficult thing is to measure the length correctly. Do this: Determine for yourself the required number of balls for each row and, based on this, estimate the length of the thread. The higher the ball, the shorter the thread.

Symbol
This is exactly what the next two coniferous trees can be called. The first is located on the wall and is made up of pieces of tinsel imitating fir branches. You can attach it with double-sided tape so that the ends do not stick out.

The second one was simply skillfully assembled with the help of many paintings, badges, souvenirs, etc., which were collected in the likeness of a spruce tree. Notice how some elements seem to imitate toys that are located on the tree. An interesting idea, by the way, for an original gift for February 14th - winter will still be in force, so a Christmas tree will be quite appropriate.

Well, dear readers, it’s time for me to say goodbye to you. The spruce hit parade is over, share your impressions: what inspired you, what you will take note of, etc. Be sure to tell your friends on social media. networks using the buttons below. Bye!
Sincerely, Anastasia Skoracheva
The New Year and this festive bustle bring back wonderful memories. For children, it is time for gifts of sweets and holidays. In general, this is probably the most favorite holiday for most people. When the whole earth is strewn with silver snow, and the house smells of Christmas trees and tangerines.
Each family has its own traditions, some go on vacation, others go to visit the older generation. But what everyone has in common is that for the New Year there should be a Christmas tree in the house, and it doesn’t matter whether it’s live or artificial. Since childhood, I remember this sacrament of dressing the Christmas tree in elegant multi-colored toys.
How to beautifully decorate an apartment for the New Year with your own hands?
But if everything is clear with the Christmas tree, then how beautifully will the apartment be decorated for the New Year? We have already published an article on our website about New Year’s decorations in the form of snowflakes. Today we will share with you the secret of how to beautifully decorate your house with your own hands, using paper Christmas trees.
I think many of the readers know several ways to make a Christmas tree. It’s not at all difficult; making one Christmas tree can only take a couple of minutes. And what to do with it, cut out the blanks, fastened them together, and here you are, ready. This is indeed true, but we have found several options for you on how to make this very Christmas tree even more colorful and interesting.
How to make a very beautiful large Christmas tree out of paper?

We are all accustomed to small tabletop Christmas trees made of paper, but we suggest thinking more broadly; you can make a very beautiful large Christmas tree and decorate it, for example, with garlands. Yes, everything is not as simple as with small ones, but still these paper Christmas trees look very beautiful. A large Christmas tree should be made of very thick cardboard, so it will be more reliable. After you have cut out everything for the future Christmas tree, you can cover it with paint. It's just your imagination, you can make it green, white and even black. It all depends on the interior.
We have also selected several options on how to make a small Christmas tree out of paper. These instructions are very simple and clear that even a child can handle them. In our article you will find how to make a variety of Christmas trees, very simple and quite complex. We also found several options for how to make a Christmas tree using the origami technique. Lots of great ideas for your creativity.
New Year's paper crafts
New Year's paper crafts are something comparable to a ritual. For example, during this New Year's period, you need to have time to eat sweet tangerines, walk along a snow-covered street, drink aromatic cocoa, watch some New Year's film or cartoon, and, of course, make New Year's paper crafts. This joyful bustle should not deprive you of the pleasure of enjoying this wonderful and cheerful period. When the gray, boring streets are decorated with New Year's garlands and the cities begin to shine with hundreds of lights. You need to be able to just stop and breathe in the frosty winter air, and enjoy this wonderful time.
Our article will also be useful for children of primary school age. Our ideas will be useful for you to implement your paper New Year's crafts. During labor lessons, children often make interesting New Year-themed crafts.
The simplest paper Christmas tree

All you need to do is cut out two identical pieces from paper, preferably thick cardboard. And cut them in the middle as shown in the picture. All that remains is to connect them and decorate.


Origami Christmas tree

You'll need:
- One sheet of paper;
- Scissors
Let's start making a Christmas tree
- We need to take a square sheet of paper and bend it in half on each side, Figure 1;
- Bend a sheet of paper in half, in front of you is a rectangle, connect the upper right and left corners inside the figure to form a triangle, Figure 2;
- There is a triangle in front of you, connect the right and left corners in the middle, Figure 3;
- Now you need to wrap the bent corner in the other direction, as shown in Figure 4, the same thing needs to be done with the other corner;
- We repeat the same steps with the other side of the triangle, Figure 6;
- Take scissors and cut off unnecessary parts, Figure 7,8,9;
- Ready.
Volumetric simple Christmas tree made of paper

This is also a very simple way to make a Christmas tree, but such a paper beauty looks very stylish and beautiful. What we need is to cut out Christmas tree blanks from thick cardboard, there should be 6 pieces. When you cut out the blanks, cut them in the indicated places and connect them. Ready.


Volumetric multilayer paper Christmas tree
To make this Christmas tree out of paper, you need to cut out blanks of different sizes from colored paper, such as those shown in the figure. Make a large piece for the base, and reduce the size of the piece towards the top. When everything is ready, you need to wrap the protruding parts into a cone, as shown in the figure. All that remains is to simply assemble the tree and decorate it.
Christmas tree made of snowflakes

We have already told you... What we need to make a Christmas tree:
- Snowflakes made of paper of different sizes, the more there are, the more magnificent the Christmas tree will be;
- Scissors;
- Glue;
- Beads;
- Wooden or metal stick for the base;
- Pot.
- Prepare the snowflakes;
- Take the base and place the snowflakes on it, alternating the snowflake and then the bead. Secure the elements with glue;
- When the Christmas tree is ready, secure it in a pot so that the pot is not empty and fill it with rain;
- Ready.


Paper lace Christmas tree


For this type of paper craft, you will need to cut out blanks using a stencil and connect them. And you will get a wonderful composition of a winter forest.

Small Christmas tree made of small parts

In order to make this Christmas tree you will need:
- Many small circles, or parts of other shapes;
- Cone;
- Glue;
- Scissors.
Making such a Christmas tree is very simple, just glue the blank circles onto the Christmas tree and you’re done.


New Year is coming soon! Can you already feel it coming? The active mother opens the next series of materials dedicated to the most long-awaited holiday of the year. And we’ll start with the most important attribute of the New Year’s celebrations – the Christmas tree. To make New Year cards, crafts from fabric and felt, and window decorations for the New Year, you need Christmas tree templates that can be printed, cut out and used as a stencil. We are pleased to present to our readers a selection of 30 Christmas tree templates for cutting out of paper.
Christmas tree templates for crafts
These templates will serve as blanks for creating appliques, Christmas tree decorations from cardboard,. They can also be used as a pattern for textiles, a stencil for foam and plywood Christmas trees.
All images enlarge when clicked:


Christmas tree templates
Vytynankas in the form of Christmas trees are a beautiful decoration for New Year's windows and interior design. Using such templates, you can also create three-dimensional Christmas trees by printing each stencil in 4 copies and gluing their sides together. Such Christmas trees can also be used to make greeting cards, decorate a Christmas tree with them, or make a garland out of them.
To carefully cut out a Christmas tree, attach the cut-out template to a sheet of thick paper or cardboard using a stapler, place the resulting blank on a rubber (silicone) craft mat and cut out, using a special stationery knife, first the internal elements of the image, and then along its contour.
All images enlarge by clicking. To make it easier to cut out a template with a symmetrical pattern, fold the sheet with the Christmas tree pattern in half.


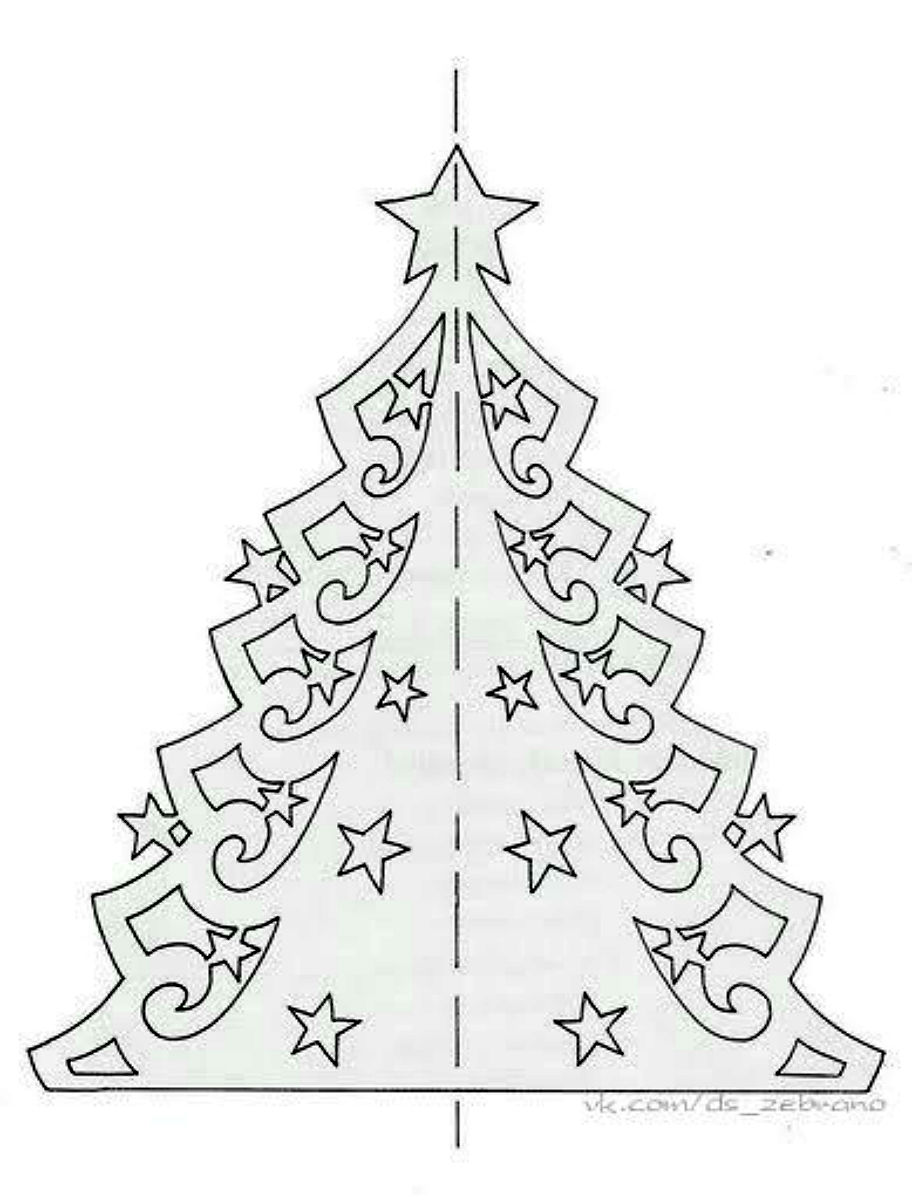


Christmas trees with an asymmetrical pattern are more difficult to cut, but incredibly beautiful.

Latest site materials
Experience

Stylish vest for girls knitted
Knitting is an ancient craft that has long served not only for practical purposes. Even in our time, it has not lost its value. After all, every woman can show her imagination, ingenuity and skill here. Link an original item for
Cosmetology

My hobby is cross stitching
Probably, each of us has some kind of “female” hobby - cooking, knitting, scrapbooking. Or cross stitch. I did my first embroidery in the fifth grade, but then a fish measuring 5 by 5 cm seemed like an impossible task, which I overcame.
Experience

How to sew your own underwear?
The portal contains addresses and telephone numbers of Moscow ateliers where you can order individual tailoring of underwear. Contacting the studio will help you buy an option that fits a woman’s figure perfectly, emphasizing her advantages and gently correcting her shortcomings. Prices
Cooking

Congratulations on the opening of a beauty salon - poetry, prose, SMS Warm words of congratulations on the opening of a beauty salon
An effective news feed that should be used to develop and promote your business. And if you do this in an unusual way, you can provide a good push to start word of mouth. In the salon business, the most difficult task is to impress guests. Outdo
Health

Outline on the topic: "Hard-boiled Egg Festival" extracurricular event Special congratulations to companies involved in the production of chickens
World Egg Day is a holiday known today in many countries around the world. It is celebrated annually on the second Friday of October. World Egg Day is a holiday for all lovers of fried eggs, casseroles, omelettes, etc.
Cosmetology

Congratulations to your beloved sister
Happy birthday, dear sister, A bright ray of my life, On this day I wish you To be loved, never get sick. May life give you gifts, Friends remain faithful, Impressions will be bright, And your wishes will be taken into account! Happy birthday to your sister