How to make a bouquet and crown of flowers. DIY paper crown
Autumn, with its bright colors, simply beckons you to go outside. I would like to collect a bouquet of beautiful leaves and late flowers and build a herbarium. But from natural gifts you can make not only a bouquet, but also a decoration. For example, the autumn crown. How to make such an unusual accessory, read below.
Crown with rowan
It is not difficult to build such a headdress. We will need a headband, a glue gun, flowers, rowan berries and dry leaves. If you are preparing the autumn crown in advance and want it to last for a long time, then you will have to prepare the leaves first. They need to be ironed and allowed to dry thoroughly, preferably under pressure.
Let's start making the headdress. First of all, we glue the rowan branches. They are heavy and bulky. It will be easy to hide the rest of the flowers and leaves under them. Now we place the main accents. We will make them using large asters. They can easily be replaced with chrysanthemums or other flowers that grow in your country house or garden. When the accents are set, we begin to glue the leaves. The main thing here is not to overdo it. 3-4 large sheets and 3 small ones will be enough. The final step is gluing small dried flowers. The autumn crown is ready.
Head decoration made of small flowers

Such a simple and elegant decoration can serve as a crown at an autumn ball. It’s quite easy to create such an accessory with your own hands. We will need a rim again, but this time a thin, wire one. Our crown will be made from orchid flowers, barberry berries and willow branches. The picture shows a sample made from artificial flowers. You can create your headdress in the same way or decorate it with live plants. We select flowers and berries in the same color scheme. If you are making a craft from artificial material, then it will be quite easy to paint it.
Let's start manufacturing. Glue flowers to the headband. They are large in the center and small on the sides. The remaining space needs to be filled with willow branches, to the ends of which we will tie berries with wire. The weave can be chaotic and asymmetrical. The main thing is that in the end the flowers and berries are distributed evenly.
Crown of maple leaves

This is a rather non-trivial way to make a headdress. Our autumn crown will consist of a cardboard rim, maple leaves and gold beads. The first step is to prepare the material. We dry the leaves and make a cardboard rim 4 cm wide. First we glue the front row of leaves. We bend the rim and secure them with a glue gun. Thus, the cardboard strip was surrounded on both sides by leaves. Next we glue the second row. Now we fix the leaves on the back side of the rim. Thus, we make the “wrong side” beautiful. The final touch is gluing the gold beads. It is advisable not to attach them along the entire perimeter of the crown; it is better to place such an emphasis on the front part.
Crown hat

Children simply adore this headdress. It replaces summer wreaths with them. Even a child can make a crown for an autumn ball from maple leaves. We will tell you two methods for making it. The first method is similar to weaving dandelion wreaths. Only here, instead of flower stems, we will bend and add branches of leaves.
The second method is more time-consuming. For such a crown you will have to make a cardboard base in the form of a circle. We will tie ribbons to its ends, which will make it easy to take off and put on the headdress. The maple leaves will need to be ironed and dried first. And then, using a glue gun, fix it on a paper rim. It is advisable to make the crown magnificent. Therefore, you need to glue the leaves not in one, but in at least two rows.
Gothic crown

This headdress looks quite intimidating. But some girls achieve exactly this effect. It’s very easy to make an autumn one in this style. We will need thick wire, branches, electrical tape, paint, chains, beads and autumn leaves. Let's start manufacturing. First, let's twist the wire into a headband. Then we wrap it with a branch. For this purpose, you can use soft and pliable willow twigs. Now, using electrical tape, we attach the branches to the crown. These can be branched branches of an apple tree or rowan tree. When everything is ready, paint our headdress black. It is advisable to use spray paint for this purpose. This will ensure that the color pigment is evenly distributed. After the crown has dried, attach chains and beads to it. You can repeat the option from our sample, where one bead is in the middle, above the forehead, and the other two are located in the area of the ears, or you can come up with your own version of the decor. The final action is to string dried leaves onto the crown.
Crown of flowers, butterfly leaves and ribbons

This headdress resembles the one we talked about in the first paragraph. But only this version of the crown is more complex. Here we will use both living and artificial materials. How to make an autumn crown this way? Let's get started. First, let's take a wide plastic rim, it will serve as the base. We glue asters and chrysanthemums to it with hot glue. We will complement the crown with both dried golden leaves and greenery from indoor plants. Grape branches will play a special role in our headdress. We glue them on the back so that they fall beautifully to the back of the head. You need to weave beads and real berries into them. You need to decorate the finished crown with butterflies, dragonflies and colored ribbons. And remember that such a headdress requires flashy makeup.
A crown made of paper, beads, and autumn leaves is quickly crafted. From the article you will learn what icing is and how to make a sweet tiara from cake mastic.
DIY beaded crown
Choose any of the options presented and go for it. See how easy it is to make a princess crown.
Here's what you'll need to get started:
- 2 types of wire: a thick section for the base and a thin one, on which we will string decorative elements;
- pliers;
- beads;
- pearls;
- beads.

Attach it with thin wire to the base. This is the kind of princess or queen crown you should get at this stage.

Next, string beads onto a thin wire. Attach these decorations to the base by placing a pearl or large bead inside.

This is such a cute queen crown.

If you don’t have beads, but have other materials, you can quickly make a head decoration for a girl.

For this we use the following:
- various beads with large hole diameters;
- cleaning tubes - 5 pcs.;
- wire cutters.

Now you need to cut the 3 remaining tubes as follows:
- the first - in half;
- the second - into 3 identical parts;
- from thirds - cut off 2/3 of its length.

Fold each piece in half and secure them to the crown as in the photo. In this case, the longest tube will be in the center.

String beads onto the decoration and the princess crown is ready.
How to make a keychain with your own hands?
If you need a crown for a girl but want to practice making a small piece of jewelry, then start by making a keychain. This thing will also certainly come in handy. You will be able to take out your keys and admire the keychain, which will be made in a single copy.
Here is a list of what you need for this craft:
- beads of three colors;
- fishing line;
- wire;
- pliers or round nose pliers.
Before purchasing beads, check to see if they have a hole large enough to allow 2 turns of wire to pass through them without obstruction.

Cut the wire to the required length and string 18 red beads onto it. Then pass the end through their holes and tighten the loop.

Place another 18 beads of the same color on this wire, also pass its free end through their holes, as a result, you will get a figure eight like this.
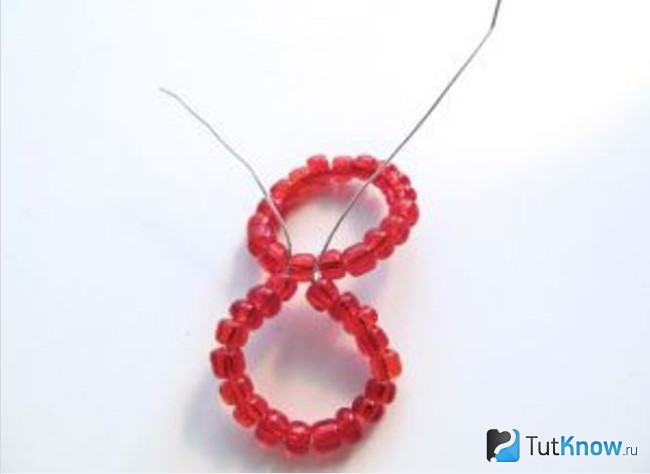
Place one circle of these small beads on top of another. Tie them together with the ends of the wire, trim off the excess edge.

On the remaining one, string 7 white beads, then one red one, then again 7 white beads. Fold this piece over to the opposite side of the ring and secure it.

Now, to the place where one red bead is located at the top, tie 2 more identical pieces of wire crosswise. Since it is bent in half, you will get 4 more fragments of the crown, string 7 white beads onto each of them, and secure with wire.

Wind another piece of wire to the top of the crown and place 12 blue beads on it. If it's a keychain, then thread the key ring through first and then secure the wire.
Here's how to make a crown so that it can become a small decoration or also a keychain.

Read how to literally make a brilliant head decoration in half an hour.
Paper crown - master class

It’s amazing how such an elegant product can be made from this simple material. Of course, in addition to this basics, you will need something else, namely:
- gold wrapping paper;
- necklace made of artificial pearls;
- glue;
- decorative large stones in the shape of hearts, diamonds and small ones;
- glue gun;
- scissors;
- and, of course, thick white cardboard for the base.
You can first measure the child's head with a flexible measuring tape, and then transfer the measurement to cardboard. Cut with an allowance so that the edges can be joined and glued.
But don't seal them yet. Place the cardboard blank on the work surface, apply a design that will be inside the crown and on top of it. Cut along these lines. If you want your work to be perfectly neat, then first apply the design to the template, then attach it to the cardboard and cut it out.
The same template will help you create the desired curls from gold wrapping paper. Lubricate it from the inside with glue, attach it to the cardboard blank, and connect it. Glue the 2 parts of the crown together and at the back.
Now apply melted silicone from a hot glue gun to the bottom edge of the crown and place the bead necklace on this spot. If you don't have one, then use individual beads, gluing them at the same distance.
A glue gun will also help to attach large and small pebbles. When the work dries, you can put it on the head of a girl or boy. After all, this product can be created not only for a young lady. The king's crown is also made for the holiday.
The templates below will help you make the top cutouts on your headdress so that they are neat and even.

Choose the shapes that you like best and make a template based on them.

Jewelry made from mastic
Housewives know that this sweet mass helps to decorate confectionery products so that they turn into works of culinary art.

At first glance, it seems that making such a cake is very difficult, but it is not so. The cakes are baked from sponge dough in a round shape. If you don't have one, a suitably sized oven-safe frying pan will do the trick. You can even bake it in a slow cooker, in a bowl.
Then the biscuit is cooled slightly, removed from the mold, and cut into 3-4 layers with a sharp long knife. When they have cooled completely, brush them with buttercream and put them in the refrigerator. You can buy mastic or make it yourself from marshmallow candies or powdered sugar. Food coloring will help achieve the desired shade.
To make the mastic stick better, grease the cake layers with butter cream not only to connect them together, but also on the top and sides of the cake. Cool it down.
After you put the mastic on the baked goods, you need to roll it out with a silicone rolling pin so that it lays evenly and tightly on the cake, and trim off the excess at the bottom. This confectionery product is decorated with pink fondant in the shape of diamonds. Their reverse side is moistened with water and glued to the main layer, and then decorated with sugar pearls.
Making a magic wand from mastic is just as easy as making a crown. Such children's mastic cakes will become a bright and unforgettable moment of the holiday. Let's take a closer look at how to decorate a homemade cake in the form of a crown. There are several ways to make it.
You can get a mastic crown like the one in the photo if you stick to this method. For it you will need:
- plastic bottle;
- cling film;
- brush;
- kandurin;
- mastic.

Now sprinkle the board or table with powdered sugar, roll it into thin “sausages” and immediately place them on the bottle. Place the first one as the rim of the tiara, the rest form and decorate it.

When the plan is realized, you need to leave the crown to dry for 1-2 days, then cover it with kandurin and place it on the cake.

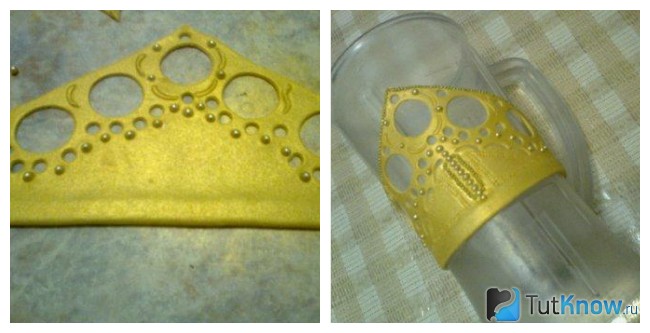
Decorations from mastic on this theme can be made a little differently. For the second one you will need gold food coloring. Roll out the mastic into a triangular layer. We cut it with a knife so that the workpiece is of this shape and is even.

Now, applying the glass, cut out identical round holes along the upper edge of the crown, and using a small stencil, cut out small circles. We decorate the crown with sugar pearls and leave it to dry well on a plastic bottle or jug.
What are icing and molds?
Very soon you will find out the answers to these questions and learn how to make incredible cake decorations from mastic. This is the product you will get if you use icing. For it, you need to draw a crown yourself or download your favorite image from the Internet.

After which it is put into a transparent file, and then the real magic begins. We roll up sweet strings from white mastic and apply each fragment to the corresponding drawing in the file.

Now you need to carefully transfer the still straight crown to a rounded surface, give it this shape and dry it for 1-2 days.

You can leave the tiara white or cover it with food paint, then you will get a golden crown.

You can get acquainted with molds - special forms right now. They will help you make a crown from mastic, which will turn out to be very elegant; a cake with such decoration will look expensive, as if it was made by great professionals.

Here is a list of what is needed for this creative work:
- silicone mold;
- glass wine bottle;
- glassine;
- food glue;
- mastic.
Place pieces of mastic in those mold elements that are most suitable for the crown. In this example, a mold was used to create a rose; you can take another one.
Start laying out the elements of the tiara on glassine paper, fastening them with edible glue.

After the crown is ready, all that remains is to cover it with kandurin using a brush and dry it.
DIY leaf wreath
If you are walking with your children through an autumn park or in the yard, invite them to make a crown. Such creativity will help children develop their imagination, learn to love the surrounding nature, and grow into creative people.

You will need very few materials and equipment, here's what:
- maple leaves;
- scissors or pliers.
Place the leaves in front of you. Use scissors or pliers to cut off the thick ends.
For work we will need:
- green cut beads - 75-100 gr.
– lilac beads – 75-100 g
– small light green beads – 10 g
- large beads - 30 g.
- beaded wire
— wide hoop (child size)
- floral tape
- satin ribbon (width 1.5 - 2 cm, length 1.5 m)
This decoration consists of several elements - a central flower with stamens, two half-opened buds, leaves and twigs with beads.
The flower petals, buds and leaves are made using the French axial weaving technique described above.
Leaves. (6 pcs.)

To make leaves, we prepare a base made of green beads. According to the above diagram, we make an axis of 10 beads. We twist the low part and the axle. Then we begin to weave arcs from the bottom. For the sheet to be sharp, the angle between the axis and the low one should be 45 degrees. After the first arc, we string one large bead onto the axis, this will make the sheet more airy and hide the unevenness of the beads. Thus, we make 4 arcs. We give the finished sheet a sharp shape. The wire at the top of the sheet (axis) is carefully folded and cut.
Bud. (2 pcs)
The bud consists of two elements - the flower itself and the sepals, each element is woven in two copies.

The flower bud is also woven using the French technique. We prepare an axis of 15 lilac beads. We weave 5 arcs, without adding beads to the central axis. We weave the sepals in the same way - the axis consists of 10 beads, the number of arcs is 5 pcs. The wire at the top of the sheet (axis) is carefully folded and cut. As you can see in photos 2 and 3, we wrap the elements in a bud and assemble them one by one.
Stamen. (5 pcs)

The stamens are made using the loop weaving technique. On a piece of wire 10-15 cm long in the middle, make one loop of 10 small beads of light green color. We twist the wire to a length of at least 3-4 cm.
Flower petals. (5 pcs)

To make flower petals, we prepare a base made of lilac beads. According to the above diagram, we make an axis of 15 beads. We twist the low part and the axle. Then we begin to weave arcs from the bottom. For the sheet to be sharp, the angle between the axis and the low one should be 45 degrees. Thus, we make 5 arcs. We give the finished sheet a sharp shape. The wire at the top of the sheet (axis) is carefully folded and cut.
Branch with beads. (4 pcs)

To make branches, we prepare a piece of wire 20-25 cm long, string one large green bead onto the middle of the piece and secure it with a turn in the middle of the wire. Then we randomly repeat the turns to the right and left, weaving branches.

Assembly The first stage is to assemble the central flower from 5 petals and stamens. Next, we attach the prepared elements to the prepared hoop with floral tape (preferably to match the hoop), starting from the center. After the central flower is secured, we attach the buds on the right and left under the petals, then place three leaves in the same alternating order and finish with a branch of beads.


We decorate the floral ribbon with a matching satin ribbon, securing the ends to the hoop with glue.
Girls love to dress up. and even more so for themed costume parties! If you are planning a Spring holiday, a birthday, staging a skit about nature, or just want to please your daughter with something unusual and memorable - make a flower hat!
DIY hat with flowers
You will need a square piece of construction paper for the base of the hat. You need to draw two circles on it: the inner one according to the size of the child’s head and the outer one in accordance with the desired width of the brim of the headdress. Then you need to divide the inner circle into sectors of 45 degrees and make cuts from the center along the lines. Now bend the “teeth” up. The base for the hat is ready.

The next stage is decorating the hat with flowers. Use 3-4 types of colored paper to make flowers and butterflies. It would be good if the flowers were of different shapes and had contrasting centers.


You can also add grass, sun, hearts, stars.


Spring princess crown

This crown is very easy to make. You will need a piece of thick cardboard for the base (you can use unnecessary packaging). Use a marker to sketch and cut out the base.

To decorate the crown we will use ordinary napkins painted with watercolors. Using PVA glue, cover the crown with colored napkins on both sides.

When the napkins stick and the product is completely dry, you can continue working. For greater expressiveness, the crown should be outlined around the edge with green paint. Then we decorate the crown with multi-colored paper flowers and glue on beads. Volumetric flowers made from folded strips of paper will make our crown even more elegant.

All that remains is to fit the crown on your young princess’s head (you can connect the ends of the cardboard tape using a stapler).
Crown with a large flower
This crown is decorated with only one, but large and very expressive flower.

We make the base of the crown from green paper ribbons of the same width. We cover the child's head with them, and then form a crosshair so that the crown does not slide onto the forehead.

We cut out the flower petals, make cuts on each of them and lightly pinch them to give the petals a curved shape. Then we attach them to the base of the flower, cut from darker paper. Using a dark green pencil, add lines at the base of each petal to give them an even more natural look.

We make the core of the flower from pieces of yellow napkin rolled into lumps, and the stamens from wires with beads attached to their ends.
Made with your own hands together with your child, it will certainly become his favorite accessory and will often be used in games and entertainment. And made specifically for some special day, it will help preserve the memories of this holiday and make it brighter.
There is nothing easier than making a paper crown using ready-made templates. They can be printed to the desired scale, enlarged or shrunk to the desired size if necessary.
Watch the video on how to make a paper crown:
Crown cutting templates
If you display the image on a sufficiently dense and, if desired, colored sheet, it can be used as a blank - by cutting it along the contour, gluing it or attaching an elastic band, you will get the finished product. But more often, printouts are used as templates (stencils).


Paper crown with sequins
A crown made of paper with sequins looks very interesting. In order to make a crown we will need: scissors, yellow or golden paper, glue and bright large sequins.
First, print out the template for cutting out the crown:

Using a template, we draw the outlines of the future crown on yellow paper.

Cut out the crown along the contour.

Glue bright sequins onto the teeth of the crown.

Glue the parts of the crown on one side.

We adjust the size of the crown according to the head and glue the crown on the other side.

Cardboard crown with cotton wool rim
Real kings and queens will surely like a crown lined with “furs” made of cotton wool.
To make a crown with a rim of cotton wool, print out a template for cutting:

Cut out the printed template along the contour.

Using the template, we draw outlines for cutting onto the cardboard.

Glue the cardboard parts of the crown together. Glue a strip of thick fabric (felt or burlap) to the inside. Such a crown will fit better on a child's head.

The base of the crown is ready! We decorate the crown with sequins and paper strips. We glue rolled cotton wool around the circumference of the crown, which we paint with yellow paint. Instead of cotton wool, you can use a strip of light fur.

Cardboard crown with flower
Choose a crown stencil taking into account the child’s preferences and the purpose of this product.
You can cut out only the front part of such a crown and attach an elastic band to it - then this accessory will fit any child.
Draw the outline of the crown on the wrong side of the cardboard. You can use a printed cutting template.


Glue a narrow ribbon on both sides of the crown.

To decorate, use shiny sprinkles - apply it to the crown, after drawing a pattern on it with glue.

All you have to do is shake off the glitter and the crown is ready.

We decorate the crown with a delicate artificial flower.

A crown with a flower will easily complement the image of a magical princess or spring fairy.

Elsa's crown from the cartoon Frozen (Frozen)
You can make a more complex product using a figured stencil, braid and bugle beads.

The length of the lower part of such a crown should correspond to the circumference of the child’s head. We simply fix the upper part with glue.

We decorate the bottom with braid.

We glue pebbles to the top and draw patterns. It turns out to be an elegant, neat attribute of power.

Elsa's crown is ready!

You can use a template for cutting out the top part with a more complex shape to make such a paper crown. The more complex the template, the more interesting the product looks.
A fun crown can be made from a paper plate. To do this, cut it from the central part as in the photo. Now we paint it and decorate it with rhinestones and sequins.

We bend the cut sectors. The crown is already ready.

Crown made from toilet paper roll
And rolls of toilet paper and towels can easily be turned into small symbolic headdresses, which are often worn by princes and princesses in fairy tales. A small crown made from a toilet paper roll looks interesting and touching. To make a crown, wrap a cardboard roll with colored tape.

We make deep cuts on one of the edges of the roll.

At the bottom of the crown we thread a rubber band through the holes. To prevent the rubber band from moving around, we tie a small nail in the inner part.

Miniature crown - ready!

Look at the video - how to make a crown for a princess with your own hands:
Decorate the crown to your taste, using all the power of your imagination - and any child will like the craft.
Latest site materials
Experience

Summary of a psychologist's lesson in the first junior group
Introduction……………………………………………………3 Purpose and objectives of the GCD……………………………………………………………. .5 Structure and form of GCD…..…………………………………………………….5 Expected results………………………………………………………6 Thematic planning …………………………………7 GCD notes: Lesson 1 “Soap bubbles”…………………
Experience

Scenario for the holiday in the class “Goodbye, ABC!
Holiday "Goodbye, ABC!" Prepared and conducted by primary school teachers of Dergaevskaya secondary school No. 23 Anufrieva I.V. and Shishkova M.N. (Q1 category) The purpose of the holiday: to motivate interest in learning, to form a sustainable interest in reading, to ensure high
Cosmetology

Traditional Austrian costume Tradition and modernity: how Austrians relate to national costume
The main thing is that, the main thing is that, The main thing is that the suit fits So that in life they will not forgive themselves Those who did not sew such a thing for themselves, Their lot is unsightly and pitiful. The main thing is that, the main thing is that, The main thing is that the suit fits. The age of honest knights has passed, It is known what n
Cosmetology

Christmas fortune-telling, rites and rituals Conspiracies and spells for Christmas
Christmas days are filled with warmth, imbued with the energy of goodness and light. Conspiracies created on Christmas night have a powerful force that can change a person’s life for the better. Let us share with you what signs and rituals there are for Christmas. Christmas
Cosmetology

Lesson on knitting various patterns “chess” Chess knitting description
Knitting patterns "cord" pattern Knitting - "cord" pattern. 1st row: knit 3, slip 1 as purl. 2nd row: purl stitches. Alternate rows 1 and 2. pattern "broken elastic band" Knitting - broken elastic band. The number of elastic loops is a multiple
Cooking

A soft rug made of roses from leftover yarn for a cozy home
Rose is the queen of the flower world. All festive events are decorated with this plant. But the disadvantage of roses is the fragility of flowering. Both in the ground and in cut form, it quickly fades. Queen of Flowers It’s a different matter - roses made with your own hands