Kimono pattern: we make it for ourselves and for children. DIY Japanese kimono: pattern, job description How to make a Japanese kimono with your own hands
The Japanese word "kimono" literally means "clothing". A kimono traditionally means a complete set of clothing, including underwear, socks and shoes. In the West, kimono means a traditional Japanese suit with wide sleeves and no fastening.
Kimono length reaches the ankles, and is wrapped from left to right. When putting it on, make sure that the collar is away from the neck.
The width and length of the rolls of Japanese fabric are decisive when designing a kimono. A roll of Japanese fabric is 36.5-39 cm wide and approx. 12 m. One roll of fabric is enough for an everyday kimono.
When cutting out a kimono, do not cut off the edges so as not to overcast the edges. Depending on the height and circumference of the hips, the details of the kimono are stitched with allowances of greater or lesser width, in order to thus achieve a fit to the figure.
The choice of material depends on the purpose and type of kimono. Silk is used for festive kimonos. There are different types of silk, such as tsumugi (raw silk made from dyed silk fibers), rintsu (plain fabric printed or painted), habutae (black, very thick silk fabric for formal occasions), sha (loose weave fabric) . On weekdays in autumn and winter they wear kimonos made of woolen fabrics. In the warm season, kimonos made of cotton and linen fabrics are used. Fabrics made from chemical fibers are increasingly being used for informal kimonos because they are easy to care for and inexpensive.
Construction of a kimono pattern
Draw a right angle with the vertex at point A, from which downwards the value of the Length of the product.
From point A, put down 1/8 of the Neck Circumference (NC) and from the resulting point draw a horizontal line to the left. Along this horizontal line, set aside 1/4 Osh plus 2 cm and draw a vertical upward from the resulting point. Draw the neck of the back in accordance with the drawing (Fig. 1).
From point A, move to the left The length of the shoulder line of the product = 1/4 of the hip circumference (H) plus 4-8 cm.
The length of the shoulder line of the product with an increase should not exceed the width of the fabric. For very full figures or tall clients, it is recommended to make a kimono from a wider fabric.
Extend the shoulder line to 1/2 of the arm span. Arm span can be measured from wrist to wrist with arms outstretched or calculated.
The kimono sleeve ends just above the wrist. The length of the sleeve should not exceed the width of the fabric.
From the point that determines the length of the sleeve, draw a vertical line down. Determine the sleeve width as desired. Mark the length of the open section of the sleeve at the hem line at the wrist.
Also note the Front Waist Length (FW) and the Armhole Height of the product equal to 1/2 FW, and draw horizontal lines to the right from the resulting points.
Below the waist line, draw a transverse fold, which is created when wrapping and tying the kimono.
To determine the depth of the front neckline, place 14-16 cm down the center line of the product from the base of the back neckline and draw a collar in accordance with the drawing. The width of the finished collar varies from 5 to 9 cm.
Draw a line for the vertical seam on the front and a line for the edge of the side in accordance with the drawing.
Cutting details of a Japanese kimono
Copy all details from the drawing.
Copy the sleeve in a mirror image relative to the top line.
Measure the length of the back neckline and lengthen the collar by this amount.
Align all cut lines, indicate the direction of the warp thread (Fig. 2).
Sleeve width
The sleeve width of a kimono is determined by marital status and the occasion for which the kimono is intended.
Married women wear kimonos with relatively narrow sleeves - 40-50 cm (tomesode). Furisode kimono (furi = flowing, sode = sleeve) is a kimono with wide sleeves for young unmarried girls. The furisode sleeve width varies from 75 to 105 cm (ill. 3).
Variations in sleeve width for furisode kimono:
Kofurisode: furisode with narrower sleeves (75 cm)
Chufurisode: furisode with wider sleeves (90 cm)
Ofurisode: furisode with very wide sleeves (105 cm)
To transfer the ratio of sleeve width to Height to European sizes, you can calculate the sleeve width using the following formulas:
- tomesode = Height/3 + (from -2 cm to +5 cm)
- furisode = Height/3 + 20-50 cm
In addition to the width of the sleeves, kimonos differ in combinations of colors and patterns, as well as material.
Kurotomesode(kuro = black) is a formal kimono for a married woman. It is blue-black in color and is worn with a white obi.
Irotomesode(iro = color) - a plain kimono with a pattern below the obi.
Komon(small pattern) is an everyday kimono with a small repeating pattern. It is suitable for married and unmarried women.
obi belt
The kimono is tied with a belt called an obi. A standard fukuro obi belt is 27 cm wide and 4 m long. For special occasions, a maru obi 65 cm wide and 4 m long is used.
There are many ways to tie an obi. The traditional knot is taiko (ill. 4). It is worn with a cylindrical pad, which is secured with an obi-scarf (obiage). The obi is tied at the top with a cord (obi-jime). Another knot is the fukura suzume, which looks more like a bow.

The choice of knot and type of kimono depends on the woman’s marital status and age. Traditional obi pads are more often worn by married women. Obi with a bow, on the contrary, is more often found on the kimono of unmarried girls. However, traditional rules have lost their strictness, and obi knots are often tied at will.
Kimono length
The length of the kimono must be no less than the height of its owner. For very plump or tall women, the length of the kimono can even be calculated with an increase in height.
The kimono is worn so that the bottom of the product is located above the feet. The kimono is then tied with a soft ribbon at the hips. The excess length is folded and secured with an obi belt.
In our article we will talk about a kimono costume, how to make a pattern of a kimono for karate, a geisha kimono, a kimono dress, a kimono for aikido.
Originally, the kimono is a traditional Japanese costume. It is so popular that it is recognized all over the world. In the mid-19th century it was recognized as the national costume of Japan.

For geishas and future geishas, these clothes are work clothes. Just the color of the fabric determines the differences between a men's kimono and a women's one.
Men's kimonos are considered to be darker colors, for example: black, blue, green, brown.
For women, naturally: pink, peach, raspberry and other delicate tones.

Each kimono has its own name. There are the following types of kimono:
- kurotomesode
- furisode
- irotomesode
- Homongas
- tsukesage
- Iromuji
- komon
- edo komon.
All these outfits have their own purpose and are used in completely different areas, for different occasions and events, for different seasons.

Men's kimonos also exist; now girls and men rarely appear in such clothes.
A very interesting feature of the Chinese people is that their customs in wearing kimonos differ only between weddings and funerals. They differ only in the color of the tie; of course, they wear a white tie for a wedding, and a black tie for a funeral.

Nowadays, kimonos for karate are very common, because from infancy children are sent to such sections.
You can purchase ready-made kits, but they are not cheap and the quality will not always be excellent.
Therefore, many parents can sew a karate kimono themselves.

It resembles a robe with spacious sleeves.
Let's look at creating a kimono with your own hands with patterns
In order to sew a karate kimono with patterns, you will need:- paper
- pencil
- centimeter
- ruler
- textile
- threads
- sewing machine
- pins.
Making a pattern for a karate kimono. You need to cut the back part into a rectangular shape. The cut of the front part, the pattern is the same, only they are cut into two equal halves. At the back you need to cut a neck with a diameter equal to 1/2 the circumference of the neck. The pattern of the sleeves, which are rectangular in shape and should be approximately 75 cm for an adult. The length of the kimono is selected in accordance with the type of training and the wishes of the athlete himself.
Transferring the pattern onto the fabric. Cut out the resulting silhouettes on the fabric, not forgetting to leave room for seam allowances. Trying on the product. If this kit suits you, grind the parts on a machine. Making a belt. As a rule, it is made from a long piece, approximately 5 meters long and 50 centimeters wide. After proper processing, a belt of 25 cm is obtained.
Your product is ready. Wear it for joy, we hope that the athlete will be comfortable in this karate kimono.

Video on the topic of the article
■ "■ lryamyuv- "to -1
SPORTS
Due to numerous requests from readers, we provide a drawing of the layout of a suit for karate and judo. The suit consists of a jacket and trousers. It is sewn from thick white cotton fabric: a jacket from thicker fabric such as matting, trousers from cotton twill. If such fabric is not available, the jacket can be made from rep paper, teak, poplin, or lining fabric. You can use white waffle towels. If the fabric is not very dense, the jacket is made double up to the waistline.
With a fabric width of 80-90 cm, the jacket takes approximately 4 m, and it has to be made on yokes.
1. The length of the jacket is determined as follows:
a) measure the length of the back to the waist line (for example, 40.4 cm);
b) measure the length from the waist to the knee (for example, 56 cm). The length from waist to knee is divided in half: 56: 2 = 28 cm;
c) to the back length measurement, add V-2 length from waist to knee plus 10 cm (40.4 + 28+10 = 78.4 cm). This is the length of the jacket.
2. Sleeve length is determined as follows:
a) hands with outstretched fingers are spread in different directions and the distance between the tips of the middle fingers is measured (for example, 170 cm). Divide this distance in half and get the estimated sleeve length (170:2 = 85 cm);
b) measure the distance from the elbow to the end of the middle finger and divide in half (for example, 46: 2 = 23 cm),
c) subtract this distance from the estimated sleeve length and obtain the desired sleeve length (for example, 85- -23 = 62 cm).
3. The length of the belt is equal to the waist measurement multiplied by two, plus 50 cm (70X2 + 50=190 cm). The belt is wrapped twice around the waist and tied with a flat knot, tightening the jacket so that it is loose, but the hems do not separate.
4. Only from matting fabric the jacket is made in one layer; from other fabrics, less dense, the jacket is made up to the waist in two layers, below the waist in one. Another layer of fabric is sewn under the back, shoulders and chest for grip strength.
5. The neckline and hems of the jacket are trimmed with trim. A soft cord is inserted into the fold of the binding. The thickened fold protects the neck from damage and chafing.
6. A gusset is sewn to the sleeve for strength.
7. Slots are made in the side seams for ease of movement.
To draw a drawing of the jacket, take the following measurements (in cm):
Half neck girth..... . 17.3
Half bust......44
Waist circumference............70
Back length to waist line. . 40.4
Length from waist to knee. 56 Distance between tips
middle fingers of outstretched hands. 170
Please note that the figures given, corresponding to size 44, are taken as an example only. You must take your own measurements.
Drawing a jacket pattern. On the left side of the sheet of paper, draw a vertical line, divide it in half and place point A. To the right of A, draw a horizontal line (Fig. 1).
D o u t e s a h a h a
Jacket width. From A to the right along the line, set aside "/g measurements of the half-circumference of the chest plus 10 cm and put A! (AAi = 44: 2 + 10 = 32 cm). Draw a vertical line through A t up and down.
Neck line From A to the right, set aside 73 measurements of the half-girth of the neck plus 2 cm and put Ao (AAg = 17.3: 3 + 2 == = 7.8 cm). From A up, set aside 3 cm and place A. From point A, set aside 40 cm downwards and place A 4. Connect points Az, A2, A4.
Back armhole depth. From A] up, set aside "/2 measurements of the half-circumference of the chest and put G (A1G = 44: 2 = 22 cm).
Front armhole depth. From A| put down V2 measurements of the half-circumference of the chest minus 2 cm and put P (A1G1 = 44: : 2-2 -■ = 20 cm). From G and G] to the right, draw horizontal lines on which set aside the sleeve length measurement (see preliminary calculation) minus the jacket width along line AAi plus 10 cm and put points P and P, (GP = e = G (P 1 = 62-32 +10 =40 cm). Connect P and P1.
Side cut of the back. From G up, set aside the length of the jacket minus the length of the segment Ail", plus 1 cm and place point H (GN = 78.4-22+1 = 57.4 cm).
Side cut front. From G] down, set aside the length of the jacket minus the length of the segment AiTj, minus 1 cm and put N, (G 1 N 1 = 78.4-20-1 = 57.4 cm). Through N and N| to the left, draw horizontal lines, the points of intersection with the line coming from point A, designate H 2 and H?.
Design of the armhole line of the back and shelf. From G up, and from P down, set aside 17 cm and put dots and G3. From G and G| set aside 18 cm to the right and place G 4 and G5. Divide the corners G 2 GG 4 and G3G1G5 in half, set aside 6-7 cm from points G and G) and place GB and G7. Connect all the dots.
Splines. From H down, and from H| put 16-18 cm up and place W.
The dotted lines in the drawing show the hem and gusset.
Rasklgtsk patterns and cutting. If the width of the fabric is 80-90 cm, it is folded in half lengthwise and the pattern is applied with line AA (applied to the fold. In this case, the jacket is sewn on yokes, placing them approximately at the waist line. The top parts are cut out in double pieces. The lower part of the back and front is cut out along the lobar Threads are not added to the seams.
Sewing. If the jacket is cut from a wide and not very dense fabric, attach a second layer of fabric to the inside and stitch it to the waist line. Place basting marks along the neckline, hem and armhole.
If the jacket has yokes, then first stitch the yoke with the lower parts of the back and front. Attach the second layer of fabric to the wrong side and sew the same lines to the first seam.
Sew the lower parts of the sleeve together with the side seams to the exact
The kimono is a classic item in Japan, worn by men, women and young children.
Its cut is quite simple, so if you need to create a Japanese-style look, you can make such an outfit yourself with the slightest financial investment. For a light Japanese-style house robe, a short knee-length kimono can be used. If you are planning to sew a kimono with your own hands, it is useful to read about this garment, because the Japanese kimono is quite different from the Chinese one.
Simply put, a kimono is a wraparound robe. It can be straight or flared, most things depend on the size of the product and the created image.
These beautiful robes can become regular comfortable clothes for home.
In addition, many different blouses, outfits and jackets can be made based on this pattern. Often kimonos are made for children who go to judo or karate. That is why you need to read about constructing such a pattern. Do not try to sew a sports kimono for boys from a sheet at home - it will burst in the first lesson.
 It is believed that a kimono is simply a large man's robe that fits any figure. The classic width of the back of this product is 60 cm, which with the help of a belt is draped exactly according to the figure and the item becomes visually smaller.
But if the volumes are very large, then wedges need to be added to the seams of the main pattern. Another unique feature of this product is that kimono has no clasp, except for the belt, which is located at the waist.
Classic men's kimono for karate they are made from fabric about 30 cm wide. This requires making the stitching part of the back, but if there is a wider material, then it is not necessary to make it, unless, of course, you want to create the image of an ancient robe.
In the cut of this item they are used only geometric figures. The back is a simple rectangle with the required length and width of 60 cm.
The front panels at the bottom are 45 cm, and at the waist the edge is cut at an angle of 15 degrees to the neckline. To process the cut of the throat, take a strip of fabric 10 cm wide, which when finished creates a five-centimeter strip.
In addition to a kimono, you will also need a hakama for karate classes.
Classical female model, worn by Japanese women, stands out for its length, which is usually made 20 cm longer than necessary for height.
Sleeve pattern
 We also cut out the sleeves in the shape of rectangles, but in a classic robe these are not the usual narrow sleeves strictly at the arms, but, on the contrary, rather wide and sewn at the corner details with a hole for the wrist in the upper corner. The entrance to the sleeve is also in the upper corner on the opposite side of our rectangle.
The sleeve is sewn into the main part of the kimono not along the full cut, but only in half, and the larger side of the sleeve, folded in half, falls not to the side of the handle, but to the hanging edge.

The remaining simple edges are sewn at an angle. Thanks to this, it is created unusual look, which distinguishes this Japanese attire from other products of similar cut.
Another sleeve cut for this robe can be created based on a trapezoid, the top of which creates a narrow sleeve, and the bottom is completely widened.
Kimono fabric
 A student of Japanese history will easily tell you that There are several types of kimono. There are models specifically for married and unmarried women, men and children, and for various holidays. But if you don’t need to learn such subtleties, then you can take any high-quality fabric to sew a robe.
Women's kimonos are usually sewn with floral motifs. Quite often, bright fabric is combined with a plain one, or you can choose materials with an exquisite and cute pattern, a smooth transition of parts of the background shade from dark and bright to translucent, which is barely visible. It is these products that can be taken as the main source for creating a magnificent kimono.
A Japanese women's robe must have a wide belt, and for it you need to take a plain material. The fabric can be the same color as the main fabric, or, conversely, stand out.
Women's kimono robe
 Before creating a dressing gown for girls, you need to take measurements and make a pattern.
To work you will need:
- Three meters of tracing paper.
- A simple pencil.
- Ruler for measurements.
In order to create a drawing of a robe, you need to know the circumference of your chest.
We draw a rectangle A-B-C-D, its length should be equal to twice the required length of the robe, the width of the pattern should be equal to 1/4 of the chest circumference with an increase of fourteen cm. Let's look at, for example, size forty-eight (chest volume = 96 centimeters) and The length of the item is 120 centimeters.
The width of our pattern = 96/4 + 14 cm = 38 centimeters.
Creating the front and back of the robe. From a and b we measure down 120 centimeters, we denote the created points with the letters d and g, we attach them using a dotted line, this is the fold line of the back and front.
In order to create neck, from point D we remove a segment equal to ten cm to the right, mark the point with the letter E, from point D we remove down a segment equal to fifty cm, mark it with point three, from D we remove upward a segment of three cm - point I; then we connect it with point E with a curve, and points E and 3 with a straight line. From point G we remove thirty centimeters up and down and mark the marks (x) - the places where we will grind the sleeves.
Creating a sleeve.
The sleeve length is a free value, everything will depend on how long the sleeve you need to make (in this case forty cm), the sleeve width is equal to 1.3 chest semicircles + fourteen centimeters (48:3 + 14 = thirty centimeters).
Now our pattern is a simple rectangle forty cm high, sixty cm wide.
Creating a pocket (two parts): the dimensions of the part are sixteen cm wide and twenty cm high.
Kimono cut.
Consumption of our material: with a width of ninety cm: two kimono lengths + one hundred and ten cm (sleeves, pockets, seam allowances). 120×2 + 110 = 350 centimeters; five meters of bias tape for our front trim and back collar to match the fabric.
How to sew a men's kimono robe, step by step
Description of work:

So we figured out how to sew a kimono.
Airy fabrics, a flying silhouette, an aura of summer relaxation and carefree laziness - even winter is no obstacle to such an atmosphere! And in the process of making this charming piece of clothing, you don’t have to work hard - everything is so simple that you’re unlikely to stop at just one piece. By the way, a handmade kimono can be a wonderful gift - you definitely can’t go wrong with the size!
You will need:
- Chiffon or silk (1m x 1m 40cm)
- Ruler
- Scissors
- Pins
Step 1

Fold the fabric in half with the right sides facing in.
Step 2
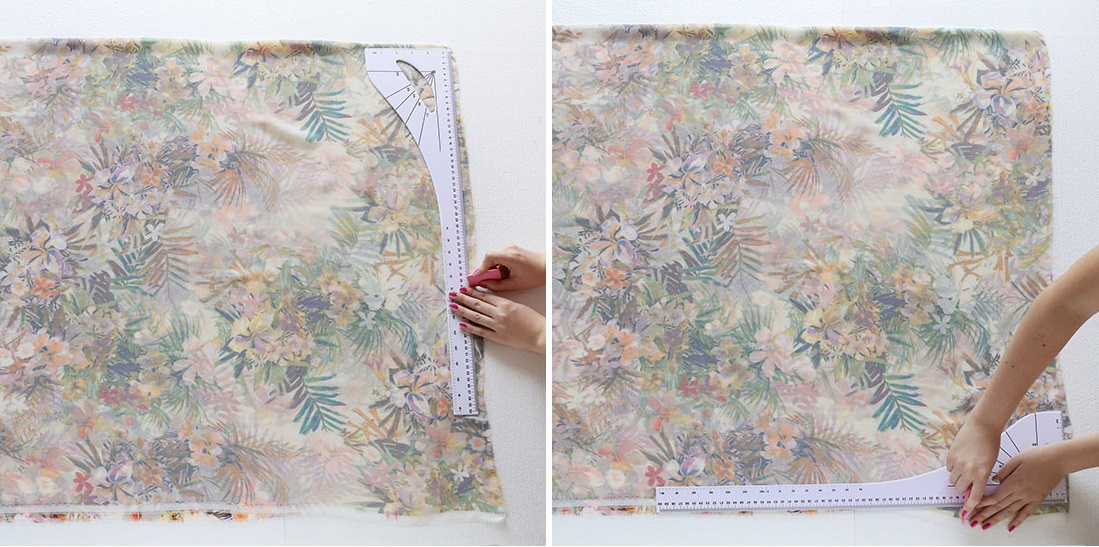
Measure 25 cm from the fold down, and then another 15 cm along the edge line.
Step 3

Draw straight lines from the deferred points until they intersect. Do the same on the opposite side - you should end up with two rectangles.
Step 4

Use pins to secure the fabric along the drawn lines and cut the resulting rectangles.
Step 5

Sew the side seams.
Step 6

Using a ruler, determine the middle of your product, draw a line and cut the top layer of fabric - from the future neck to the very bottom.
Step 7

At the last stage you need to process the slices. To do this, simply fold the fabric 2 cm, starting from the top of the neckline, and stitch. If necessary, treat the sleeves in the same way.

Photo: pinterest.com
Material prepared by Nika Bazhanova
Latest site materials
Horoscope

Photos straight, round, ascending, descending, thin, houselike
Any specialist will tell you that eyebrows are the part of your face that creates its style, tone, and features. Their shape can actually say a lot about a person. Think about it, when we show certain emotions, our face involuntarily
Cooking

Dior who is the designer. Christian Dior. Fashion House of Dior: opening and work under the leadership of Christian Dior
Every time we pronounce the name Christian Dior, we mean style, sophistication and luxury of everything that this legendary brand with more than half a century of history produces - clothes, perfumes, cosmetics. Even as a child, a gypsy predicted the future great couturier
Cooking

Artistic painting of nails How to draw poppies - master class
From year to year, nail design and artistic painting remain a trend for manicure. The amazing drawings that professionals create are simply amazing and mesmerizing. In addition, choosing this nail design means that your manicure will be absolutely unique.
Experience

Hangnails on fingers, causes, removal, treatment, prevention What do hangnails on fingers mean?
A hangnail is a tear in the skin of the nail fold. In most cases, they occur on the lateral roll of the finger, on the side of the nail, since this area is most susceptible to mechanical stress. Also a few burrs, but much less frequently, about
Cooking

The best jewelry factories in Russia Spanish jewelry brands
Fashion trends in jewelry have always interested women of any age. Everyone wants to have unique jewelry from famous jewelry brands in their arsenal. Of course, for this it is necessary, at a minimum, to know which jewelry brands they choose
