Do-it-yourself temari: history and step-by-step master class for beginning needlewomen. Master class on creating temari Japanese colored balls on
06/21/2015 | 2203

Natalia Golubkova 06/21/2015 2203
The art of creating balls of thread - temari - was born in China, became traditional in Japan and today is of interest everywhere.
It is believed that these bright “balls” bring happiness and prosperity to the house, so it is customary to give them as gifts, decorate the New Year tree and pots with plants with them, and simply use them as interior decor.
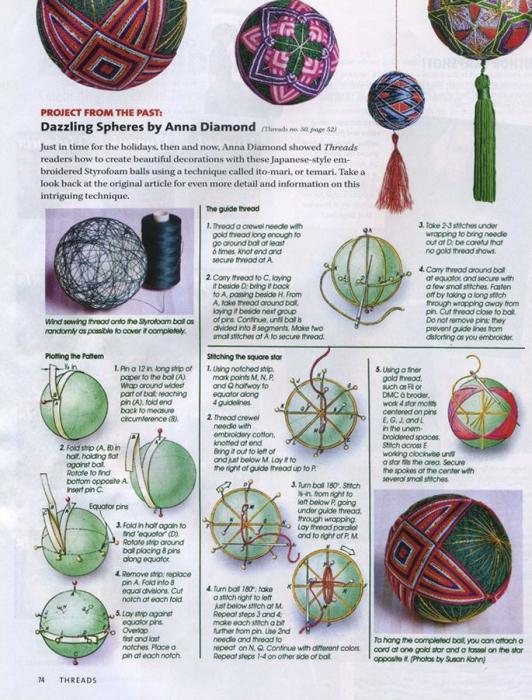
Authentic temari (translated from Japanese as “hand ball”) are fabric bags with rice husks, wrapped in strips cut from old clothes, and on top - thick and thin threads. But my mother does it easier.
Step 1
He tightly stuffs scraps of elastic fabric (mostly old nylon tights) about 30-40 long and 1.5-2 cm wide into a plastic bag. He forms a ball the size of an orange from them, cuts off the excess polyethylene, and distributes the ends of the bag over the surface of the ball, without gluing them to the flaps. Secures the polyethylene with thick cotton threads, wrapping them around the ball in all directions.
To keep the ball even, maintain an even tension on the thread and from time to time crumple it in your hands and roll it on the table.
When the polyethylene is closed, cut the thread, leaving an end about 1 m long for performing reverse stitches. Sews the surface of the ball with 15-20 stitches, inserts a darning needle under the winding, brings it out after 3 cm and cuts the thread.
Step 2
The next stage is marking the ball using guide threads, since traditional temari patterns (chrysanthemum, flowers, bamboo, abstraction) are built according to geometric patterns. Cuts a strip of durable but easily wrinkled paper (for example, from the cover of a glossy magazine) the length of the circumference of the ball plus 2-4 cm.
"Stars"
The top and bottom must be exactly opposite each other!
Step 3
The strip completely bends around the ball, bends it and smoothes the fold - the first fold is obtained. Then he unwinds it, bends it up to a pin with a red head and puts in a second fold - this will be half the length of the ball’s circumference. The center line of the ball is obtained by folding the strip upward again so that the second fold touches the pin. Next, he connects the first fold with a pin and smoothes the fourth fold, the purpose of which is to point to the middle of the arc of the lower part of the ball.
Using scissors, cut small corners at the base of each fold. He wraps a paper strip around the ball, starting with a red pin, and sticks pins with heads of different colors into each corner.
There should be six pins on the ball, and each one should be inserted at the same distance from its neighbors. If the pattern is complex, mark the required number of divisions between the corners on the strip and insert pins into the new cutouts. It is more convenient when there is an even number of them.
Step 4
The marking is made with a lurex thread with a length of six girths of the ball plus 10-15 cm. He ties a knot and makes a stitch in an arbitrary place, after which he sticks the needle exactly in the place from which it came out, and this time brings it out at the bottom of the ball, close to the pin with black head.
"Intertwining Diamonds"
The thread wraps the ball six times from bottom to top, from left to right and crosswise - along all the pins. Secures the thread with several stitches and tucks the tip under the winding.
“You can use winding, weaving and embroidery to decorate temari,” says my mother. – I like the last one. In it, stitches need to be made around guide (cotton or wool) threads. I use silk or floss as decorative threads.”
She creates square and diamond-shaped patterns using method 1.
The needle and thread are brought out at point 1, inserted into the ball at point 2 under the guide thread and brought to the surface at point 3. Next, the needle is inserted into the ball at point 4, brought to the surface at point 5, inserted at point 6, brought out at point 7 and enters again at point 8. One completed stitch in the round comes out. The same steps are repeated at the crosshairs of other guides, starting from point 1 and laying new threads next to the laid ones. So my mother embroidered the “Intertwining Diamonds”, “Stars” and “Summer Mood” balloons.
"Summer mood"
Oval patterns are embroidered using method 2. After completing each stitch, the ball is turned counterclockwise so that the next stitch starts higher.
The needle with decorative thread is brought out at point 1 to the left of the guide thread and inserted into the ball at point 2, also to the left of the guide. Draws the thread under the guide and brings it out at point 3, to the right of the guide. Inserts the needle at point 4, to the right of the guide. One full circle of embroidery is made. Next, the stitches are placed similarly close to each other. The result is a temari like “Pink and Blue Dream”.
"Pink and Blue Dream"
For the herringbone pattern, mom uses method 3, getting a “pigtail” on top and a V-shape on the bottom.
The needle and thread are brought out at point 1 and inserted at point 2 under the guide. Brings the needle to the surface at point 3 and then inserts it at point 4, brings it out at point 5 and inserts it at point 6 under the guide, and then brings it to the surface at point 7.
Having covered the entire ball with the pattern, the needle is brought out at point 1. A thread of a different color is laid in the same way parallel to the first. An example is “Pink and Blue Dream.”
"Pink and Blue Dream"
If you are using threads of three or four or more colors, it is better to leave the areas free from embroidery empty so as not to overload the color impression of the temari. At the same time, in this case, and with a more meager palette of colors, you can create a simple pattern of straight stitches with thin lurex thread. This will give the ball an even more elegant, festive look.
The art of temari is embroidering bright patterns on balls. Patterns can be simple or abstract, with shapes intersecting at different angles (triangles, rhombuses, ovals, squares, ellipses, and so on). This is a very fun and relaxing craft that you can do at home, while sitting in front of the TV, or while traveling.
Have you decided to make your own temari balls? You will understand how to make this craft by reading this article to the end. But first, let’s find out where these amazing products came from.
History of origin
So, what are temari balls, and how can you make them with your own hands? You are probably interested in similar questions. Let's start with the history of the origin of "temari".
This is quite an ancient art. It originated in China. And about six hundred years ago, these balls of extraordinary beauty were brought to Japan.
Initially they were made for a ball game called “kemari”. Remnants of fabric from old kimonos were used as filling, which were then wound and stitched to form a ball. Later the game was transformed, the ball was no longer kicked, but began to be passed using the hands. This is how “temari” appeared.
The game also became popular among young girls who came from noble families. The girls began to decorate their playing balls - embroidering them with silk. Thus, the simple game of ball has become a fine art.
Over the years, the craft of embroidering temari balls has become popular throughout Japan. Subsequently, each region of the country had only its own ornament, not similar to the others.
A Temari museum has been opened in Japan, which details the origins of this art. There are also specialized schools that teach how to make temari balls, and upon completion of training, a diploma is issued.
Magical Japanese crafts
Today, temari balls are valued as gifts that symbolize sincere friendship and devotion. According to Eastern tradition, the Japanese give them to their children for the New Year. They put a piece of paper inside where they write their wishes.
The patterns that are embroidered on the balls and the threads themselves often have a specific meaning. For example, gold and silver threads symbolize the wishes of prosperity, wealth and well-being. The Japanese believe that temari brings good luck and happiness.
Now this art of embroidery is known in different countries, and many people love it.
You can make balloons with your own hands and give such an unusual New Year gift to your children. And this is a great idea! We suggest making your own temari balls.
How to make balls from multi-colored threads
To create such a masterpiece you will need:
1. Base. To do this, you can use scraps of elastic fabric, polystyrene foam, or a tennis ball.
2. Pins with different colored heads.
3. Bobbin threads. They will be needed for winding the base.
4. Iris threads of various colors. Needed for embroidering patterns.
5. Needle with a blunt end.
6. Silver thread (will be a guide).
7. Scissors.
8. Sheet of paper. You can take an office one.
9. Plastic bag.
10. Centimeter tape.

These are the materials you need to prepare to make temari balls. Read on to learn how to make a fabric ball base.
Making the base
Take pieces of fabric. Stuff the bag tightly with them. Form a ball with a diameter of five centimeters (you can make the size of the craft larger if you wish). Cut off excess polyethylene. Wrap the thread tightly around the base, thereby also securing the bag. Do this evenly, apply each turn to a new place so that you get an ideal base surface, because in the future patterns will be created on it. Then secure and stitch the base several times.
In Japan, sometimes small bells are placed inside the ball, making something like rattles.
Marking
To embroider a temari ball, you must first apply markings. Cut a ribbon one centimeter wide and thirty centimeters long from paper.

Markings must be made to indicate the top (“North Pole”), bottom (“South Pole”) and middle (“Equator”). Take a red pin and stick it anywhere. This will be the top of the ball (“North Pole”). Attach the end of the tape there. Wrap it around the ball. This way you seem to draw the diameter of the workpiece. The strip should fit tightly to the ball. Then bend it in half. This way you will determine the lowest point - the “South Pole”. Mark with a different color pin. Then fold the ribbon in half again and cut the corners on one side only. Then wrap the strip around the ball again. Place pins in the places where the corners were made.

This will be the "equator". Take a centimeter. You will need it to determine the distance between the segments. Measure them. It is important that they are the same. In our case, we should get segments of six centimeters. Once all the points are marked, begin wrapping the base with silver thread from pin to pin (this will be the guide). You could say that this is how you designate the axes. Now you can apply beautiful embroidery.
How to embroider temari balls
Pattern diagrams can be found in specialized magazines. So, let's start embroidering.
Take a needle and thread the yellow thread. Make the first turn as follows. Pull the thread from the “North Pole” through the “South Pole”, and return to the “North” again. Then make a second turn perpendicular to the first. Start again at the “North Pole”. Pull the needle out so that the thread catches the guide and the winding. You should end up with four identical sectors.
Then move the needle inside the ball to the pin, which is located on the “equator”. Make four turns.

Insert a brown thread into the needle. Make four turns along the guide on each side. Repeat these steps with each color. At the same time, the width of the “belts” should gradually increase. Pay attention to how the threads lie. There should be no gaps!
As soon as the threads begin to fall off the ball, it is time to finish the work. Make a couple more rows of brightly colored thread along the last “belts”, secure the thread. That's all, the temari balls are ready.
Step-by-step instructions, detailed marking and embroidery diagrams will make it easy (if you have at least minimal needle and thread skills) to master such an original skill. Good luck to you in the difficult but amazingly beautiful art of temari!
Love for all ages. Including the love of handicrafts. To be convinced of this, just look at the stunningly beautiful collection of temari balls, which was embroidered by a 92-year-old grandmother.
These stunning colorful balloons were sewn by a 92-year-old grandmother from Japan.
The ancient Japanese art is called temari. When it originated, woven multi-colored balls became simply toys for small children. Over time, they changed several uses until they became an element of interior decoration. Today, each region of Japan has its own characteristic colors and patterns.
Mrs. Akua became acquainted with the art of making temari in the early sixties. Since then, she has managed to create about five hundred incredibly beautiful balls with a unique design.
We invite you to evaluate your grandmother’s skill and look at her work over the past two years.


The process of creating temari is very labor-intensive. In order to embroider one ball, talent alone is not enough, you need to have years of preparation and a huge amount of time behind you.


How to make your own temari.
You will need:
Elastic fabric flaps
2 spools of thick cotton thread
Scissors,
Plastic bag.
1. Tightly stuff a thin plastic bag with scraps of elastic fabric (worn tights will do), form into a ball the size of an orange and cut off the excess plastic.

2. Distribute the cut ends of the polyethylene over the surface of the ball without gluing.
3. Wrap the thread around the ball in all directions, securing the polyethylene.

4. Continue winding the thread straight from the spool, making sure to maintain an even tension. If you tighten the thread too much, the shape of the ball may be distorted, and if you wind it loosely, the embroidery will lie unevenly.
5. From time to time, crumple the ball in your hands and roll it on a hard surface so that it is level

6. When changing the direction of winding, hold the thread with your left thumb so that the tension does not weaken.

7. Cover the entire surface of the ball with an even layer of thread so that the polyethylene is not visible anywhere. Please note that during the process the filler will be compacted and the ball will decrease slightly in size.

8. Having finished the rough winding, cut the thread, leaving an end approximately 1 meter long for backstitching. Sew the entire surface of the ball, making 15-20 stitches, insert the needle under the winding and remove it after 3 cm.

When the temari base is formed in the form of a very dense rag ball, the top layer of decorative threads is wound, along which the actual embroidery is carried out. Traditional patterns are usually geometric, sometimes incorporating free-flowing embroidery elements. In any case, work on temari begins with preliminary marking of the ball with special threads.
There are very few types of markings, they have been known for centuries, and all the variety of patterns is based on them. Traditional Temari used only 2 types of stitches for embroidery and several techniques for wrapping the ball, on the basis of which typical design elements were developed, which, by the way, have their own names. The variability of patterns is achieved through various combinations of known elements and their different locations on marking nodes.
One of the simplest markings is marking into four sectors. Using pins with different colored heads, mark the “poles” of the temari (two points located at opposite ends of the ball) and four points on the equator - they should be at equal distances from each other and from the poles. Wrap metallic embroidery thread along all the pins, dividing the ball into equal sections. The winding should start from the top pin and end there; in this place the thread should be secured and the “tail” tucked under the winding. With proper skill, you can divide the ball into an even number of sectors without pins, by eye.
Then you can start decorate temari. Balls of thread can be decorated in different ways, using them in combinations. The most common methods include:
- Winding with decorative threads along the guide lines. To make it hold better, you need to fasten it in some areas with small stitches with the guide thread you used to mark.
- Embroidery different types of stitches.
- Weaving. Usually it is combined with embroidery. By passing one thread under or over another, you can create braided patterns.
Having decorated the ball, you need fasten the thread. You can decorate the finished temari with a decorative thread tassel or a loop for hanging.
Japanese balls made of thread - temari - are a very original type of needlework. With a little practice you can learn create real works of art.


Temari is a traditional type of Japanese needlework, a decorative ball embroidered with an ornamental pattern. The word “temari” itself is translated from Japanese as “princess ball”, and the history of these balls begins in the eighth century.
Then the game "kemari" - "foot ball" - came from China to Japan. In this game you had to throw a small leather ball with your feet, and it was played exclusively by aristocrats. Gradually the game passed to the noble ladies, and they preferred not to kick the ball with their feet, but to throw it from hand to hand. Since the balls were now treated much more carefully, they began to be decorated with rich silk embroidery. This became a traditional women's handicraft - aristocrats competed in making temari, coming up with the most intricate patterns. Thus, the game gave rise to decorative art, and temari turned into decoration, a luxury item, an expensive gift and a talisman.
In this master class we will try to master the simplest, basic techniques for making temari.
Materials for making temari:
- unnecessary scraps of knitted fabric
- multi-colored threads (“iris” or floss)
- scissors
- pins (preferably with multi-colored heads)
- a strip of paper about a centimeter wide and about 20 cm long
- bobbin threads;
- needle.

DIY temari ball decor
First of all, we need to make a base for our ball. To do this, take knitted scraps and cut them into narrow (1–2 cm) strips, which we wind into a ball. We try to wind tightly and evenly so that the shape is as close to the ball as possible.

The next layer is bobbin thread. We wind them over the knitted ball, pulling tighter. It is important to change the winding direction more often to make it smoother. If at the previous stage the ball turned out to be crooked, then here you can correct it.
The layer of thread should be thick enough; I used almost the entire spool for this. When finishing the winding, leave a long end of the thread, thread it through the needle and make several stitches in different directions to further secure the top turns. Then make a regular knot, hide the thread under the wrapping and cut it.

Now we proceed to the most important stage - marking. Here we will need pins and a paper strip.
Pin the tip of the strip to the ball.

We wrap the strip around and where it meets the pin again, bend it back. You can trim at this point.

Our strip needs to be divided into four parts; to do this, we bend it in half and in half again (“accordion”). Just keep in mind that you need to bend it up to the pin hole. The short ponytail on the other side is not included in the overall length.

On each fold we cut out small triangles; they should reach approximately the center of the strip in width. Pin the tip again with a pin and wrap the strip around the ball. The second pin needs to be inserted on the opposite side from the first, in the corner of the triangle.
These two pins will represent the "poles". To make sure that the “poles” are really equidistant from each other, rotate the strip, approaching the second pin from different sides. It should always hit the corner exactly.

Now mark the “equator” (it is better to use pins of a different color for this). We find the center between the poles and stick one pin there.

Then we pull the strip harder so that it comes off the “pole” to which it was pinned. We wrap around the equator and find its remaining points.

It’s better to double-check all distances, just in case. After all, the more accurately the markings are made, the better the pattern will fit.

And now we come to the most interesting and creative part - embroidering the pattern. In this master class we will master the “squares” pattern, the simplest and most basic one.
In order to embroider this pattern, you must first set the guide lines. We thread a fairly long thread into the needle and tie a regular knot at the end. We stick the needle into the ball and bring it out as close as possible to one of the “poles”. We stretch and pull harder so that the knot is hidden under the winding.

We make a revolution around the ball, at the starting point we turn ninety degrees and make another revolution.

Approaching the starting point again, we secure the turn with a small stitch.

One more stitch crosswise, and we take the thread to the side.

We move to the nearest point of the equator, sticking the needle in where the thread came out on the previous stitch. Thus, these “dashes” will hide under the winding and will not be visible.
Having brought the thread to one of the points of the equator, we make another turn.

We fasten it with a “cross”, like the previous one. And then, also making our way under the winding, we go around all the intersection points and make “crosses” there, fixing the markings. That's it, the pins can be removed.

We hide the unnecessary thread as follows: a few stitches under the winding, stretch it, cut it. We do this with all the threads that need to be finished.
We start a new thread, it needs to be brought out next to one of the “crosses”.

Look carefully at the following photo. This stitch will form the basis of our pattern.
It is imperative to hook not only the marking thread, but also several winding threads.

With these stitches we move in a spiral, placing them very close to each other. Gradually a square emerges.

You can change colors during the process to make the pattern more interesting. We need to extend the corners of the square to the middles of the lines connecting the marking nodes (for simplicity, it is better to immediately mark these places with pins).

Now, if you repeat such squares at each marking node, they will meet at the corners and you will get a solid pattern.

Temari is the Japanese art of embroidering balls, which takes about six years to master. In Japan there are several levels of training for this type of needlework, but our craftswomen have gone further. In addition to classic temari, they create pyramids, jewelry, and experiment with satin stitch, beads, sequins, and knitted decorative elements. So, let's learn the basic lessons on creating unusual balls.
Lesson 1: what to make temari balls from
In our country, these products are used as decoration for homes, cars, Christmas trees, key rings, and even beads, bracelets, and earrings are made according to their type. Depending on the function of the product, one or another material is taken: for Christmas tree decorations - a foam base, for toys - fabric.
For any temari you will need the following materials:
- foam or tights, fabric, cellophane;
- wool, cotton and sewing threads;
- scissors;
- 30 cm paper strip 0.7 mm wide;
- tape measure;
- pins;
- needles of different lengths.
If a foam mold is used as a basis, then wrap it with wool without gaps, and then with bobbin threads. Rewind tightly in different directions. Once all the gaps have been closed, insert the end of the thread (about a meter) into the needle and secure the weave of the ball in different directions with small stitches.
You can make temari balls with your own hands from tights or other elastic material. Form them into a circle, cover them with cellophane and cut off the excess ends. Without glue, spread the polyethylene and start wrapping it with bobbin threads, that is, you do everything the same way as with a foam ball.
Lesson 2: making markings
Attach the paper strip to the ball and pin the beginning with a pin. Then wrap the temari in a straight circle. The Japanese art of embroidering balls is characterized by clear markings, which form a particular pattern. Once you measure, remove the strip and fold it in half. Cut the fold into a triangle. Mark intersection points with pins, preferably multi-colored ones.
According to this pattern, from the first point, wrap the ball with a strip in the opposite direction, also bend it in the middle and mark it with a needle. It is this strip between the poles that is laid out in equal sections and then marked into sectors using pins. It is used in complex ornaments. Beginners can make only four marks on the equator.
After all the pins have been placed, you need to check that from any position of the ball their parallel ends are located on the same line. After marking, you get a kind of globe with meridians and an equator.
Lesson 3: embroider temari balls
We continue the marking master class. Take a contrasting bright thread (similar in thickness to iris) and wrap the ball at the marked points. Now you can clearly see the lines of the poles, meridians and equator. Tie the thread with a simple knot (so that it can linger among the plexus of threads).
Next, thread a thread of the same color into the needle and secure all the lines using 2-4 mm stitches. When embroidering, be careful not to move the marks. Remember, the needle must be long and sharp to pass through the embroidered temari balls. We secure the thread in a simple way: bring the thread through half of the ball and carefully cut it at the base.
Now embroider a simple pattern of squares. Insert the needle and thread near the pole and go clockwise around each mark, making small stitches to secure in a perpendicular direction. It turns out to be a square. After 1 centimeter, take a thread of a different color and continue temari embroidery. Do not cut off excess threads, as the main and additional shades alternate.

As soon as the square reaches the middle of the marking, move on to the next motif. There should be 6 figures in total. Unsewn areas can be left as is or decorated as desired.
Embroidering spindles
Let's look at another pattern for temari. The master class will be devoted to spindles or petals. Divide the ball into four parts as described in the lessons above. Now use three needles of different colors to divide the meridian line into equal 4 parts between the existing marks.
Next, make a knot and insert the needle and thread into the ball not far from the first pin. Now you need to go around all the pins, creating a “petal-spindle”. The thread should not be placed loosely or pulled together, otherwise the pattern will be deformed. Change colors to create an unusual design.
Please note that the next row becomes larger and wider than the previous one, due to which the “spindle” pattern is obtained. Embroider the design until you reach the interlacing of the poles. Next, you also create 4 more vertical “spindles”.

Japanese temari balls have an unusual color, so we will make an interlace. Turn the ball over so that the edges of the petals point up and down. Use three pins to divide the meridian so that one of them is in the middle of the spindle. We embroider the petal according to the same pattern, only insert the needle under half of the design. As a result, it turns out that on each side the petal either overlaps the previous spindle or hides behind it.
Create a chrysanthemum
Let's move on to temari. A master class on embroidering chrysanthemums requires attention and skill. Make markings into 8 or 12 sectors, the more, the more magnificent the flower will be. Next, mentally divide the distance from the pole to the equator into three parts and insert a pin along each meridian one third from the equator. This will be the size of the chrysanthemum.
Now you embroider a kind of four-digit star with threads. Then, using the same scheme, create a figure that seems to be superimposed on the first one. To make it easier to see the angles of the stars, alternate pins of two colors when dividing the petals. The result will be four pins of each color, forming a square.

Now, using the resulting markings, in the same sequence, embroider the stars until the pattern reaches the equator. It is best to embroider flowers on a dark green temari background. To get a beautiful chrysanthemum, make the base with gold threads, and alternate further rows from light pink to dark red. Also make a second chrysanthemum on the opposite pole.
Embroidering wings
Divide temari into 6 sectors. Embroidery of balls begins with a hexagon at the poles in the same way as a square was created earlier. Next, outline the corners of the wings. To do this, use three pins to create an isosceles triangle, dividing the distance from the pole to the equator in half.
Now, using a contrasting thread, we embroider peculiar wings that intersect each other, and begin with marking pins. To make it clear, let’s call the three marking pins A, B, C. From top A we go to base B, make a stitch and go perpendicular to the base clockwise to top C, from where we go to base A, from which we create top B.

As a result, the hexagon is sheathed on all sides at the top of the poles, and three triangles are formed at the bottom. The wings can be made on both sides, then the pattern does not cross the equator or will be on one side, but the triangles are embroidered to the last. Empty spaces can be left or decorated as desired.
We intertwine rhombuses
Take the temari and divide it into the equator and 8 sectors. Now in each hemisphere, divide half of the meridian into two and mark it with pins. These will be the corners of the diamonds on the temari. The master class on marking the ball is described above when considering the embroidery of wings. The equator is then divided in half again. It is these marks that will determine the width of the diamond.

First, embroider rhombuses that touch each other at the corners at the equator. Then embroider shapes that intertwine the sides. The embroidery pattern is the same as for creating intersecting spindles. That is, if you look at the rhombus, the opposite sides are under the pattern, and the remaining two sides are on top of the ornament. Use different colors of thread to create an unusual, bright design.
Five pointed star
Let's look at how to embroider a star on temari. A master class on marking and embroidery is described above when studying the process of creating a chrysanthemum. Make a ball, determine the equator and divide it into five sectors. Further from the equator and pole, mark the middle. And with threads you embroider the borders of a five-pointed star according to the template that you drew with a pencil in childhood.
Now along these lines you embroider first in one color for about five to eight millimeters, then in another color until the corners of the star reach the equatorial line. On the reverse side you embroider a similar figure.
You can experiment a little with embroidery and jump over a row. That is, you start embroidering five millimeters in one color, then leave the background a centimeter and make a star in a different color of the same thickness. The result is two stars on one pole, with the large figure overlapping the lines of the small one. If you use transitions like diamonds, you will get intersecting lines. Empty spaces and the middle of the figure can be decorated with decorative details.
Basic rules for making temari:
- wrap the ball with woolen threads, then with bobbin threads;
- wrap in different directions, tightly, without gaps;
- If desired, secure the ball with random stitches in different directions;
- Make the markings even, especially the poles and the equator;
- use multi-colored pins to mark different levels;
- start working with a large node;
- leave the knot at a distance of 3 centimeters from the start of work;
- Secure each line with a 2-5 ml stitch;
- embroider clockwise;
- fastening is done using a needle, with which you capture not only the line of the pattern or meridian, but also part of the base in the perpendicular direction;
- when the thread ends, pull the needle on the other side of the ball and cut the end close to the base;
- When embroidering, the thread should not be loose or tight, as in this case the design will be deformed.
Even a beginner can make any Japanese balls. Temari (master class with squares) start with 4 sectors, then move on to more complex patterns. You can draw a circle on paper, dividing it into sectors (diagonals), draw a pattern and repeat it on your ball using threads.
Latest site materials
Health

What is the best gift to give on March 8?
The time of year beloved by many is soon approaching - spring, when after winter hibernation nature awakens, and with it our beloved women bloom. At the beginning of spring, we celebrate International Women's Day - March 8th. It is on this day that we congratulate
Cooking

Useful gifts for men: list of the best gifts Birthday tool kit
When we talk about a gift for a good friend or beloved man, dad, grandfather, an association immediately arises: tools. A man is the owner of the house, he is its protector, and who else but him should give the tool of a real businessman. What exactly to give? Rassm
Experience

Knitting for newborns - instructions for beginners
Made from super purified German Baby Wool yarn from Schachenmayr. If you still have about 125 grams of this yarn, then you can also knit this blouse for newborns. Together, the hat and blouse will make an excellent winter knitted set
Horoscope

How to choose a high chair for feeding a child so as not to make a mistake?
The baby grows very quickly, and finally the moment comes when he begins to sit independently and try food other than mother's milk or formula. It is during this period that you need to think about purchasing a high chair.
Experience

Simple New Year's crafts with children: inspiring ideas and master classes
15 New Year's crafts you can do with your kids! There is very little time left until the New Year, and it’s time to think about holiday decorations for the home. You can buy ready-made options in the store, but it’s much better to make your own original things
