DIY origami. Paper figures
The art of creating figures from a sheet of paper has Japanese roots. Once upon a time it was available only to rich and noble people, it developed in monasteries and had a sacred meaning. About 800 years ago, thanks to the cheapening of paper, origami began to become widespread. From temples and monasteries it came into the everyday life of the Japanese, but was still highly valued.
How origami activities affect children's development
Now this is a popular form of creativity, not only loved by children, but also very useful for their development.
- The use of origami in preschool education began in the 18th century: the German teacher Froebel noticed that children 6-7 years old, keen on making paper figures, quickly acquired basic knowledge in geometry.
- This stimulates manual work and improves fine motor skills, which in turn has a positive effect on the development of speech and logical thinking.
- In the process of work, the child is faced with the need to follow the developed scheme. This teaches him to act according to instructions: the willingness to accept guidance from others is a very important quality in adult life.
- Starting with clear actions according to the intended algorithm, children gradually move on to their own creativity. They learn to act creatively, make unexpected decisions, and experiment.
Origami crafts are becoming more complex, and children as young as 8 can already create an original little thing—a gift for mom or a friend, or a beautiful interior decoration. This increases their self-esteem and pushes them to further creativity.
There are a huge number of origami schemes of varying levels of complexity.
For beginners, the simplest ones are suitable, which involve literally a few steps: boat, butterfly, bird.
Experienced craftsmen complicate the elements and create real masterpieces: figures of people, animals and birds with many smallest details. Here are some interesting paper origami for children - suitable for first experiments and more complex ones.
Origami "Airplane"
Many people are familiar with this model from their childhood.
- Take a rectangular piece of paper. Bend along to mark the middle.
- We bend the corners of one short side to the middle line.
- We bend the entire sheet in half approximately in half so that a small corner is visible on the other side - this will be the “nose” of the plane.
- Turn the workpiece over.
- We bend the corner to the center line, thus aligning the edge. Turn the workpiece over again.
- On the side opposite the nose, we make bends: they will help us form the wings.
- We bend the corners to the center line and begin to work on the wings.
- Bend the figure along the center line. The nose of the plane is ready.
- By eye we divide the side that will become the wing into three parts.
- We bend the sheet along the marked line running along the lower third.
- Our plane is ready!
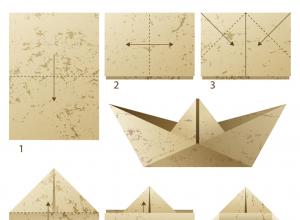
Origami "Boat"

Another simple craft using the origami technique.
- Take a sheet of size A 4. Bend it in half across and in half again, this time lengthwise.
- Unfold the sheet so that it is folded in half.
- We bend the corners from the folded middle down.
- We turn the strip of paper at the bottom upward and bring the corners to the other side. We do the same with the strip on the other side.
- We got a “cocked hat”. We put our thumbs inside and turn it sideways towards us.
- Fold the bottom of the square up. We repeat this action on the other side.
- We unfold the structure again so that the side and middle parts swap places.
- Pull to the sides by the side parts.
- The ship turns around.
Origami "Bird"

This is a more complex craft that requires some preparation and the ability to understand the diagram. To create a waterfowl, take a square sheet of paper.
- Fold the sheet in half diagonally and bend the corners on one side towards the center line.
- On the opposite side we also bend the corners towards the center.
- We have a rhombus.
- Open the corner on one side of the diamond.
- We bend the figure along the fold line, placing the inverted part on the side of the rhombus. Repeat this step for the other side.
- We bend the workpiece in half, bending one of the sides.
- We ended up with an irregular rhombus, folded and with an off-center.
- We bend the smaller part of the rhombus (triangle) in half, and bend its top in the other direction. We get a bent triangle - it will become the tail of the bird.
- Bend the workpiece along the center line/axis.
- We begin to work on shaping the bird's neck. Bend the corner opposite the tail inward.
- We turn the figure over and bend it again.
- We turn one corner inward - it will become the head. After this step it should look like a raised neck.
- To make the head, bend the corner inward at the neck.
- We bend the wings, turning them away from the base of the body. The bird is ready.
Origami is a popular form of creativity for children and adults. Even the smallest child will enjoy watching adults fold a boat and then play with it. You can practice folding paper together at an early age; there are origami schemes for children 4-5 years old.
The benefits of origami
How will such an activity help in the development of the baby? For a child, origami can be a fun game that develops dexterity. Folding paper is a great development because when folding sheets, finger coordination improves. This will help in the development of speech, when learning to write and will be useful in music school.
In addition, accuracy, intelligence, memory, logic, perseverance, and imagination develop. Working with will help you understand mathematics better.
Another advantage of origami for children 4-5 years old is that no special tools are required for the activity. All you need is a piece of paper. To diversify the creative process, regular pencils, markers, colored paper, glitter, beads, buttons, etc. can be useful.
The simplest 4-5 years
Schemes can be found in children's magazines or on the Internet, and having some experience, you can come up with them yourself. First, you need to interest the child by putting together several figures yourself. Very quickly the baby will want to repeat your actions. Start with the simplest figures and gradually move on to complex ones. To begin with, it is better to choose simple animals and flowers.
A tulip is a simple shape made from colored paper. It can be a gift for mom, grandmother, teacher, or decorate a greeting card. It is extremely simple and it will not be difficult for a child to repeat it.
Take a square piece of paper and fold it diagonally. Bend the corners of the resulting triangle as shown in the diagram, bend the lower tip of the flower. To make a stem, bend the corners of the new square towards the center, fold the resulting shape in half and fold the bottom corner. Now the parts can be glued together or attached to a piece of paper.
The simplest ones are animal figures. The child learns to recognize images and is interested in playing with such animals. They can be used to draw eyes, nose, mouth, antennae, decorate with pencils, collect a collection of fairy tale characters or domestic animals, wild, sea, African, etc.
For example, to make a dog, just fold a square sheet diagonally, form hanging ears from the side corners, and a muzzle from the bottom corner. Now you can draw or glue a nose and eyes.

Making a cat is as easy as making a dog. You just need to bend the ears more strongly, because the animal’s muzzle will be on the other side.

This way you can create a whole zoo! From triangles of different widths, make bodies for the animals, draw or cut out and glue tails and paws.
Paper origami for children 4-5 years old of average difficulty
The most popular figures - an airplane and a boat - can be folded by every parent. A grown-up child will quickly remember the sequence of actions and will soon repeat them.

More for children 4-5 years old does not necessarily imply a design with many folds; it can be made up of simple parts. For example, origami “teremok”. From simple, similar details of “rooms”, form a house and populate it with fairy tale characters. You can come up with large rooms for each animal, draw furniture in them, and glue shutters to the windows. Such a craft can become a real family project that will constantly develop and be supplemented.
Origami is also an art that began to develop in Japan, and now funny cranes, frogs, and boats are known in many countries.
The name “origami” itself is a derivative of two words “ori” - “folding” and “kami” - “paper”. Often, one sheet of paper is used to fold origami, and then different folds are used in a certain sequence. Classic origami is the art of creating various figures from paper without using scissors or glue. He has a type of kirigami - paper sculptures.
In Japan, origami was associated with religious symbols, and each figure was assigned a special meaning. Initially, paper was very expensive and valuable, so only rich people could afford to do origami: beautiful figurines were presented as gifts, they were used to decorate homes and temples. Over time, the complexity of the figures increased, and real masters of their craft appeared who created real masterpieces.
Of course, it’s difficult to make a work of art with kids, but it’s better to start as early as possible. For a child to master the process of making paper crafts, it will take time and a little patience. It is best to start classes at the age of 4-5, first you can make this or that figurine, and the child will observe, then you can involve the child in this activity. Moves from elementary and basic figures to more labor-intensive and complex ones.
Origami is not only an interesting pastime, but also significant benefits. Fine motor skills, coordination of movements, spatial and creative thinking develop.
With the help of origami, you can instill in your child patience and perseverance, and help you realize the capabilities of your hands. Even elementary geometry can be studied with the help of figures: tell your child what an angle, vertex, square, circle, and so on are. By the way, it is also useful for adults to take a break from the usual hustle and bustle and do something creative and interesting.
In this article we offer you origami schemes for the little ones, but the little ones will have to work hard to create their first independent masterpiece.
Ship
.jpg)
This is probably one of the most famous origami crafts. To make this you will need a rectangular sheet of paper. It needs to be bent in half, and then the upper corners are bent inward to form a triangle. We bend the remaining part of the rectangle, and then slightly stretch the figure until a diamond is formed.
Now the final stage: we bend the protruding corners on both sides, you get a kind of pyramid. It needs to be bent a little and sides made for the ship. The ship is ready to sail! Now is the time to try it out in the stream or even in the bathtub!
Basket
.jpg)
.jpg)
A paper basket for storing writing instruments or picking berries can be made from a simple sheet of paper. We bend the sheet diagonally, the strip at the bottom needs to be cut off or carefully torn off, and then fold the sheet again, but along a different diagonal. We bend the corners of the square inward, towards the center of the figure. We turn the workpiece over, bend one quarter of the square towards the center and take out the corners, and do the same with the other side. The result is small triangles, they need to be bent inward, the ends with right angles are also bent inward. Once again we turn the workpiece over, bend the ends with right angles to the sides, turn it over, form a basket by pulling the inner edges and give it a square shape. The product is ready!
Airplane
Take a regular sheet of A4 paper. Now bend it in half, the upper corners should coincide with the vertical. Now we bend the side edges inward again. The resulting triangle also needs to be bent in half and you get airplane wings. Now let your child arm himself with paints or markers and paint his work, and then you can practice flying!
.jpg)
Cat
.jpg)
Take a square piece of paper and fold it in half to form a triangle. The top and bottom corners need to be folded evenly.
Now we bend the diamond in half, bend the corners-ears a little inward, and then straighten them so that they stick out slightly. Now take a felt-tip pen and add the missing details: eyes, nose, mustache, cat's mouth.
Your child will definitely enjoy making these fun little things with mom or dad.
Cobra
To make a cobra like this you will need a square sheet of paper. We bend it diagonally, then unbend it again, folding the sides towards the diagonal.
.jpg)
Then bend the sides again towards the center of the figure, fold the sides from the bottom to form two triangles, and then lower the top corner, turning our figure inside out. Now is the time to color the resulting cobra.
.jpg)
.jpg)
Bird
You will need a square sheet of paper. Conditionally mark the middle lines on it and fold along them, bend the corners towards the center of the figure.
.jpg)
Now fold the corners diagonally.
.jpg)
The workpiece must be folded in half again.
.jpg)
Bend the corner inward.
.jpg)
.jpg)
Now we take felt-tip pens and finish drawing the bird’s eyes and wings.
.jpg)
Owl
Take a square sheet of paper, roughly divide it in half and fold it diagonally.
.jpg)
We bend the corners along the lines.
.jpg)
The top corner now needs to be folded forward.
.jpg)
We draw big eyes, maybe a beak, paint the wings. The owl is ready.
.jpg)
Bunny
We take a sheet of square format, fold it diagonally, then fold the bottom part along the line.
.jpg)
We bend the top corner, bend the bottom corners along the drawn lines towards the center of the figure. We bend the bottom corner up.
.jpg)
Now we draw (or glue paper cut-outs) eyes, nose, teeth. The funny bunny is ready!
.jpg)
little penguin
We bend the square sheet diagonally, then step back a little from it and bend the corner, bending it forward.
.jpg)
We turn the figure over, bend the corners along the drawn lines.
.jpg)
We bend the corners again, and then turn the workpiece over again.
.jpg)
We bend the corners on the sides, and bend the top corner down.
.jpg)
We draw the eyes, you can color the body. The little penguin is ready.
.jpg)
Your children will definitely enjoy simple crafts, and origami will become a new family tradition!
Master class: “In the kingdom of Neptune”
Completed by: Yana Grankina 5 years
Head: Ryazantseva Valentina Mikhailovna, teacher of the preschool educational institution “Kindergarten No. 52 “Cheburashka”, Novoaleksandrovsk, Stavropol Territory
The master class is designed for preschoolers, teachers, and parents.
Purpose: as a gift, interior decoration
Target: Development of fine motor skills in the process of mastering the origami technique
Tasks:
Develop creativity, eye, fine motor skills, creative imagination
Cultivate patience and accuracy.
Learn to create gifts with your own hands
There are different fish in the world,
They swim as they have been called since childhood.
Those who named them were playing with words.
Have you ever met these fish?
Necessary materials: scissors, glue, colored paper, foil cardboard for the background.
Work order:
Making fish using origami technique
Mark the diagonals
.jpg)
.jpg)
Fold the basic “double triangle” shape along the marked lines.
.jpg)
Fold the top layer of paper ~1/3 from the center fold line
.jpg)
Do the same operation with the opposite part.
.jpg)
Turn the part over
.jpg)
Glue the eye on the fish - the fish is ready. Similarly, we make several more fish from other paper.
.jpg)
Origami is a great way to take your mind off boring things, diversify your free time, and find something new for yourself. And origami for children is a way of development.
While creating the figurine you and your child need, the baby’s fingers work, developing motor skills, thinking and imagination develop. Also, joint origami crafts are another reason to pass the time with your favorite child!
Translated from Japanese, origami means folded paper. But the art of origami appeared not in Japan, but in China, and for a long time it was accessible only to the highest ranks of the Middle Kingdom. The ability to create paper figures was considered good manners. In Europe, people learned about origami only after the Second World War.
Nowadays, origami is popular among both adults and children. In our article you can find out which simple paper origami is best to do with a child at a given age.
What can a 3-year-old child master faster? Origami for children 3 years old
At 3 years old, a child is not yet ready for long, diligent activities, so from the variety of origami for 3-year-old children, it is worth choosing simpler figures. For starters, cups, an airplane, a grasshopper are suitable - these figures are the simplest and do not require much time to make. The child can also try to make a gift card himself. It's not difficult at all. You will need a sheet of colored paper folded in half, cut out shapes also from colored paper and glue. Of course, your imagination won’t hurt, but it’s best to let your child have a splash of imagination.
At 3 years old, your child will enjoy making simple origami animals, such as a cat, dog or bunny. You can make flower origami with a three-year-old child.
Schemes for making origami


Origami for children 4 and 5 years old
For older children aged 4 or 5 years, origami that is a little more complex than the previous ones is suitable. Instead of the usual dog's face, you can make a well-known frog or build a house out of paper. A full-length dog or a mushroom would be perfect. Come up with your own fairy tale, where different heroes will live together. The child will enjoy this activity, it will calm his nervous system and diversify his thinking.
Origami patterns for a child 4 and 5 years old


In this article we told you about the simplest origami for children. Involve your kids in fun activities like origami. Create your own farms, houses, vegetable gardens. Such crafts will not go to waste; for example, they can be taken to various exhibitions in a kindergarten or school, or left as a keepsake for your child.
See also photos with diagrams of various origami.
A selection of photos of origami diagrams

Latest site materials
Cooking

DIY origami. Paper figures. Paper origami for beginners Simple modular origami for children 6 years old
The art of creating figures from a sheet of paper has Japanese roots. Once upon a time it was available only to rich and noble people, it developed in monasteries and had a sacred meaning. About 800 years ago, thanks to cheaper paper, origami began to gain popularity.
Health

Why does Santa Claus give coal to bad children?
One mention of a cheerful man in a red cap immediately gives rise to memories of a happy childhood, the anticipation of the holiday, gifts under the tree and various kinds of goodies. The prototype of Santa and Grandfather Frost was Saint Nicholas, who did not live in the North at all
Experience

Alexey Kosinus - biography, information, personal life
Alexey Kosinus (real name - Alexey Komov), known as Dj Kosinus, DJ Kosinus. Born on June 26, 1982 in St. Petersburg. Russian musician and DJ, leader of the electronic project Zeskullz. Music style: electro-house and triple house.
Cooking

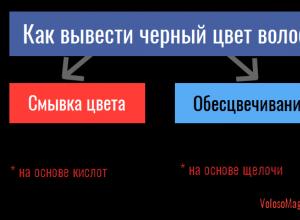
Black hair color is bright and adds contrast to your appearance. But wearing it all the time is boring and tiring. Lighter shades have the ability to constantly change the direction of color: golden, pearl, etc., but with a dark color there is no particular revelry
Laughing statuses about your best friend Quotes about your best friend funny short
Horoscope

Darling, are you staying with your friends for a long time? No. I'll quickly get drunk and go back. The girl dived into the water of the pool, and suddenly a shark swims out of the depths. The girl froze in fear. It was a friend who washed off her makeup. I was not surprised when one of my friends asked another
Happy birthday (13 years old) to a girl

